[{"name":"Everest Base Camp Helicopter Tour","duration":"1","image_url":"https:\/\/www.havenholidaysnepal.com\/storage\/trip-galleries\/1\/thumb_6cd53005d75a86e373d31419d1b14d78.webp","offer_price":1195,"url":"https:\/\/www.havenholidaysnepal.com\/trips\/everest-base-camp-helicopter-tour"},{"name":"Everest Mountain Flight","duration":"1","image_url":"https:\/\/www.havenholidaysnepal.com\/storage\/trip-galleries\/4\/thumb_3b0b4f1d6f72b0ad224daf4752f2c6e0.jpg","offer_price":285,"url":"https:\/\/www.havenholidaysnepal.com\/trips\/everest-mountain-flight"},{"name":"Everest Short Trek","duration":"9","image_url":"https:\/\/www.havenholidaysnepal.com\/storage\/trip-galleries\/5\/thumb_BXPP3621.JPEG0.02033800 1727957098.webp","offer_price":995,"url":"https:\/\/www.havenholidaysnepal.com\/trips\/everest-short-trek"},{"name":"Gokyo Valley Trek","duration":"12","image_url":"https:\/\/www.havenholidaysnepal.com\/storage\/trip-galleries\/6\/thumb_10bc469b14731f23d3ce84a7092ad53f.jpg","offer_price":1195,"url":"https:\/\/www.havenholidaysnepal.com\/trips\/gokyo-valley-trek"},{"name":"15 days Annapurna Base Camp Trek","duration":"15","image_url":"https:\/\/www.havenholidaysnepal.com\/storage\/trip-galleries\/7\/thumb_87d1533bc45faf070990aef0579e4be4.jpg0.81855100 1728285496.webp","offer_price":785,"url":"https:\/\/www.havenholidaysnepal.com\/trips\/15-days-annapurna-base-camp-trek"},{"name":"Nepal Pilgrimage Tour","duration":"14","image_url":"https:\/\/www.havenholidaysnepal.com\/storage\/trip-galleries\/8\/thumb_02c3bcf2ad2e8a4c1703e90ae747b5f1.jpg","offer_price":1475,"url":"https:\/\/www.havenholidaysnepal.com\/trips\/nepal-pilgrimage-tour"},{"name":"UNESCO World Heritage Site Tour","duration":"10","image_url":"https:\/\/www.havenholidaysnepal.com\/storage\/trip-galleries\/9\/thumb_unesco-world-heritage-site-Lumbani-temple-buddhists-hindus-kathmandu-nepal0.36988600 17347617740.93089500 1737469667.webp","offer_price":715,"url":"https:\/\/www.havenholidaysnepal.com\/trips\/unesco-world-heritage-site-tour"},{"name":"Island Peak Climbing","duration":"16","image_url":"https:\/\/www.havenholidaysnepal.com\/storage\/trip-galleries\/11\/thumb_Island peak0.53947000 1734692503.webp","offer_price":2495,"url":"https:\/\/www.havenholidaysnepal.com\/trips\/island-peak-climbing"},{"name":"Upper Mustang Trek","duration":"18","image_url":"https:\/\/www.havenholidaysnepal.com\/storage\/trip-galleries\/12\/thumb_upper mustang 7 Oct-2024.jpg0.95398900 1728286166.webp","offer_price":2995,"url":"https:\/\/www.havenholidaysnepal.com\/trips\/upper-mustang-trek"},{"name":"Annapurna Circuit Trek","duration":"16","image_url":"https:\/\/www.havenholidaysnepal.com\/storage\/trip-galleries\/15\/thumb_tibetan-flags.jpg0.04843900 1728289138.webp","offer_price":985,"url":"https:\/\/www.havenholidaysnepal.com\/trips\/annapurna-circuit-trek"},{"name":"Gosainkunda Lake Trek","duration":"10","image_url":"https:\/\/www.havenholidaysnepal.com\/storage\/trip-galleries\/16\/thumb_5A8083B3-C007-41A8-853F-D0C37C97D235_1_105_c.jpeg0.52581200 1731845258.webp","offer_price":595,"url":"https:\/\/www.havenholidaysnepal.com\/trips\/gosainkunda-lake-trek"},{"name":"Zip-lining in Pokhara and Dhulikhel","duration":"1","image_url":"https:\/\/www.havenholidaysnepal.com\/storage\/trip-galleries\/18\/thumb_215f765e2ebc995dd5c800b4bfdbacc3.jpg","offer_price":82,"url":"https:\/\/www.havenholidaysnepal.com\/trips\/zip-lining-in-pokhara-and-dhulikhel"},{"name":"Annapurna Heli Tour","duration":"1","image_url":"https:\/\/www.havenholidaysnepal.com\/storage\/trip-galleries\/19\/thumb_d71a6bbb9fd4da8d1b567a5cdbdec85d.jpg","offer_price":555,"url":"https:\/\/www.havenholidaysnepal.com\/trips\/annapurna-heli-tour"},{"name":"Paragliding in Pokhara","duration":"1","image_url":"https:\/\/www.havenholidaysnepal.com\/storage\/trip-galleries\/20\/thumb_de788d2dd9726783431f882c007efae1.jpg","offer_price":65,"url":"https:\/\/www.havenholidaysnepal.com\/trips\/paragliding-in-pokhara"},{"name":"Ultra-Flight in Pokhara","duration":"1","image_url":"https:\/\/www.havenholidaysnepal.com\/storage\/trip-galleries\/21\/thumb_e27a9fb572a5c21611bb2a3c18e4b8f0.jpeg","offer_price":175,"url":"https:\/\/www.havenholidaysnepal.com\/trips\/ultra-flight-in-pokhara"},{"name":"Sarangkot Hiking","duration":"1","image_url":"https:\/\/www.havenholidaysnepal.com\/storage\/trip-galleries\/22\/thumb_100ef822fea19987166c6c1366215f15.jpg","offer_price":55,"url":"https:\/\/www.havenholidaysnepal.com\/trips\/sarangkot-hiking"},{"name":"Mera Peak Climbing","duration":"18","image_url":"https:\/\/www.havenholidaysnepal.com\/storage\/trip-galleries\/24\/thumb_d16ae3895f678cf26ffbf2455f541fb5.jpg0.31883400 1732617790.webp","offer_price":2475,"url":"https:\/\/www.havenholidaysnepal.com\/trips\/mera-peak-climbing"},{"name":"Lower Dolpo Trek","duration":"18","image_url":"https:\/\/www.havenholidaysnepal.com\/storage\/trip-galleries\/26\/thumb_Dolpo Galary - 1.JPG0.37725200 1727939952.webp","offer_price":2995,"url":"https:\/\/www.havenholidaysnepal.com\/trips\/lower-dolpo-trek"},{"name":"Nagarkot Sunrise\/Sunset Tour","duration":"1","image_url":"https:\/\/www.havenholidaysnepal.com\/storage\/trip-galleries\/27\/thumb_5147a5532644283a380f2e86f3857c13.jpg0.17748000 1728488108.webp","offer_price":30,"url":"https:\/\/www.havenholidaysnepal.com\/trips\/nagarkot-sunrise-sunset-tour"},{"name":"16 day Everest Base Camp Trek","duration":"16","image_url":"https:\/\/www.havenholidaysnepal.com\/storage\/trip-galleries\/28\/thumb_IMG_4311.JPG0.64984800 1727942213.webp","offer_price":1475,"url":"https:\/\/www.havenholidaysnepal.com\/trips\/16-day-everest-base-camp-trek"},{"name":"Ghorepani Poon Hill trek with Jungle Safari and Trishuli River Rafting -13 days","duration":"13","image_url":"https:\/\/www.havenholidaysnepal.com\/storage\/trip-galleries\/29\/thumb_Ghorepani Poon hill.jpg0.48460800 1728281439.webp","offer_price":795,"url":"https:\/\/www.havenholidaysnepal.com\/trips\/ghorepani-poon-hill-trek-with-jungle-safari-and-trishuli-river-rafting--13-days"},{"name":"Mardi Himal Trek","duration":"12","image_url":"https:\/\/www.havenholidaysnepal.com\/storage\/trip-galleries\/30\/thumb_s1.jpg0.62112600 1728200721.webp","offer_price":795,"url":"https:\/\/www.havenholidaysnepal.com\/trips\/mardi-himal-trek"},{"name":"Langtang Valley Trekking","duration":"10","image_url":"https:\/\/www.havenholidaysnepal.com\/storage\/trip-galleries\/31\/thumb_IMG_4702.JPG0.84916500 1727958504.webp","offer_price":685,"url":"https:\/\/www.havenholidaysnepal.com\/trips\/langtang-valley-trekking"},{"name":"Real Adventure Tour in Nepal","duration":"9","image_url":"https:\/\/www.havenholidaysnepal.com\/storage\/trip-galleries\/32\/thumb_ebd1b8cc78d90abe8b9003dd9a2f25bf.jpg0.82151300 1728213516.webp","offer_price":695,"url":"https:\/\/www.havenholidaysnepal.com\/trips\/real-adventure-tour-in-nepal"},{"name":"Luxury Tour in Nepal","duration":"10","image_url":"https:\/\/www.havenholidaysnepal.com\/storage\/trip-galleries\/33\/thumb_8574e61b252b18676b042caf30d830df.jpg","offer_price":1675,"url":"https:\/\/www.havenholidaysnepal.com\/trips\/luxury-tour-in-nepal"},{"name":"Luxury Everest Panorama Trek With EBC Heli Sightseeing","duration":"8","image_url":"https:\/\/www.havenholidaysnepal.com\/storage\/trip-galleries\/34\/thumb_URZL2397.JPEG0.01209600 1728027820.webp","offer_price":2575,"url":"https:\/\/www.havenholidaysnepal.com\/trips\/luxury-everest-panorama-trek-with-ebc-heli-sightseeing"},{"name":"13 day Everest Base Camp Trek with Helicopter","duration":"13","image_url":"https:\/\/www.havenholidaysnepal.com\/storage\/trip-galleries\/35\/thumb_IMG_4292.JPG0.70131500 1728029276.webp","offer_price":2095,"url":"https:\/\/www.havenholidaysnepal.com\/trips\/13-day-everest-base-camp-trek-with-helicopter"},{"name":"Manaslu Circuit Trek","duration":"16","image_url":"https:\/\/www.havenholidaysnepal.com\/storage\/trip-galleries\/36\/thumb_Mt Manaslu 03-Oct-2024.jpg0.65804900 1727938470.webp","offer_price":955,"url":"https:\/\/www.havenholidaysnepal.com\/trips\/manaslu-circuit-trek"},{"name":"Kanchenjunga Base Camp Trek","duration":"21","image_url":"https:\/\/www.havenholidaysnepal.com\/storage\/trip-galleries\/37\/thumb_Kanchanjunga Trek -!.jpg0.54744400 1727938497.webp","offer_price":2275,"url":"https:\/\/www.havenholidaysnepal.com\/trips\/kanchenjunga-base-camp-trek"},{"name":"Ganesh Himal and Sing-La Trek","duration":"18","image_url":"https:\/\/www.havenholidaysnepal.com\/storage\/trip-galleries\/38\/thumb_Ganesh Himal slider-1.jpg0.43764500 1727937722.webp","offer_price":2975,"url":"https:\/\/www.havenholidaysnepal.com\/trips\/ganesh-himal-and-sing-la-trek"},{"name":"Island Peak Climb with Everest Base Camp Trek","duration":"21","image_url":"https:\/\/www.havenholidaysnepal.com\/storage\/trip-galleries\/39\/thumb_2be428730fe83525bc85a010564f99de.jpg","offer_price":2750,"url":"https:\/\/www.havenholidaysnepal.com\/trips\/island-peak-climb-with-everest-base-camp-trek"},{"name":"Students' Adventure Tour in Nepal","duration":"12","image_url":"https:\/\/www.havenholidaysnepal.com\/storage\/trip-galleries\/41\/thumb_a926d22fbfe08cba271c41ac289b3fd2.jpg","offer_price":995,"url":"https:\/\/www.havenholidaysnepal.com\/trips\/students-adventure-tour-in-nepal"},{"name":"7 Day Poonhill Trek","duration":"7","image_url":"https:\/\/www.havenholidaysnepal.com\/storage\/trip-galleries\/42\/thumb_6196bd69036473293a2c24cc21ed57d7.jpg0.10880600 1728205378.webp","offer_price":555,"url":"https:\/\/www.havenholidaysnepal.com\/trips\/7-day-poonhill-trek"},{"name":"7 Days Annapurna Base Camp Trek","duration":"7","image_url":"https:\/\/www.havenholidaysnepal.com\/storage\/trip-galleries\/43\/thumb_IMG_2214.JPG0.08204900 1728202033.webp","offer_price":355,"url":"https:\/\/www.havenholidaysnepal.com\/trips\/7-days-annapurna-base-camp-trek"},{"name":"3 days Poonhill Trek","duration":"3","image_url":"https:\/\/www.havenholidaysnepal.com\/storage\/trip-galleries\/44\/thumb_Poon hill.jpg0.60816600 1731412954.webp","offer_price":165,"url":"https:\/\/www.havenholidaysnepal.com\/trips\/3-days-poonhill-trek"},{"name":"Poon Hill Luxury Trek with Chitwan-12 days","duration":"12","image_url":"https:\/\/www.havenholidaysnepal.com\/storage\/trip-galleries\/45\/thumb_Poom hill.jpg0.52074500 1730180532.webp","offer_price":1175,"url":"https:\/\/www.havenholidaysnepal.com\/trips\/poon-hill-luxury-trek-with-chitwan-12-days"},{"name":"Everest Luxury Trek-7 days","duration":"7","image_url":"https:\/\/www.havenholidaysnepal.com\/storage\/trip-galleries\/46\/thumb_ACRX9330.JPEG0.93236200 1728031275.webp","offer_price":1975,"url":"https:\/\/www.havenholidaysnepal.com\/trips\/everest-luxury-trek-7-days"},{"name":"Hindu Pilgrimage Tour in Nepal-10 days","duration":"10","image_url":"https:\/\/www.havenholidaysnepal.com\/storage\/trip-galleries\/47\/thumb_a94bf96a4d31decb419f6f828a3280d2.jpg","offer_price":995,"url":"https:\/\/www.havenholidaysnepal.com\/trips\/hindu-pilgrimage-tour-in-nepal-10-days"},{"name":"Everest Base Camp Short Trek-12 days","duration":"12","image_url":"https:\/\/www.havenholidaysnepal.com\/storage\/trip-galleries\/48\/thumb_IMG_4311.JPG0.52680100 1727945154.webp","offer_price":995,"url":"https:\/\/www.havenholidaysnepal.com\/trips\/everest-base-camp-short-trek-12-days"},{"name":"Everest Base Camp Hike 12 Days","duration":"12","image_url":"https:\/\/www.havenholidaysnepal.com\/storage\/trip-galleries\/49\/thumb_IMG_4260.JPG0.51729100 1728061234.webp","offer_price":1295,"url":"https:\/\/www.havenholidaysnepal.com\/trips\/everest-base-camp-hike-12-days"},{"name":"11 Days Everest Base Camp Trek","duration":"11","image_url":"https:\/\/www.havenholidaysnepal.com\/storage\/trip-galleries\/50\/thumb_IMG_4249.JPG0.21392500 1727946959.webp","offer_price":985,"url":"https:\/\/www.havenholidaysnepal.com\/trips\/11-days-everest-base-camp-trek"},{"name":"6 Days Annapurna Base Camp Trek","duration":"6","image_url":"https:\/\/www.havenholidaysnepal.com\/storage\/trip-galleries\/51\/thumb_6 days Abc.jpg0.58185400 1728200798.webp","offer_price":285,"url":"https:\/\/www.havenholidaysnepal.com\/trips\/6-days-annapurna-base-camp-trek"},{"name":"Annapurna Base Camp Trek","duration":"8","image_url":"https:\/\/www.havenholidaysnepal.com\/storage\/trip-galleries\/52\/thumb_IMG_2214.JPG0.29415700 1729487656.webp","offer_price":585,"url":"https:\/\/www.havenholidaysnepal.com\/trips\/annapurna-base-camp-trek"},{"name":"Everest Base Camp Trek with Helicopter Fly Out 10 Days","duration":"10","image_url":"https:\/\/www.havenholidaysnepal.com\/storage\/trip-galleries\/53\/thumb_IMG_4328.JPG0.52056600 1728058444.webp","offer_price":1875,"url":"https:\/\/www.havenholidaysnepal.com\/trips\/everest-base-camp-trek-with-helicopter-fly-out-10-days"},{"name":"Everest Base Camp Trek 14 Days","duration":"14","image_url":"https:\/\/www.havenholidaysnepal.com\/storage\/trip-galleries\/54\/thumb_Everest Base Camp Trek 14 days Oct 3 2024.JPG0.43202700 1727939745.webp","offer_price":1455,"url":"https:\/\/www.havenholidaysnepal.com\/trips\/everest-base-camp-trek-14-days"},{"name":"ABC Trek with Poonhill 11 Days","duration":"11","image_url":"https:\/\/www.havenholidaysnepal.com\/storage\/trip-galleries\/55\/thumb_ABC with fishtail.JPG0.21441100 1728277965.webp","offer_price":555,"url":"https:\/\/www.havenholidaysnepal.com\/trips\/abc-trek-with-poonhill-11-days"},{"name":"Muldai Hill Trek 9 Days","duration":"9","image_url":"https:\/\/www.havenholidaysnepal.com\/storage\/trip-galleries\/56\/thumb_7efee59f0a8c6817c8255bd2b9f3539d.jpeg0.19479300 1728213091.webp","offer_price":675,"url":"https:\/\/www.havenholidaysnepal.com\/trips\/muldai-hill-trek-9-days"},{"name":"Mardi Himal Trek 6 days","duration":"6","image_url":"https:\/\/www.havenholidaysnepal.com\/storage\/trip-galleries\/57\/thumb_slider 1.jpeg0.36909700 1728184981.webp","offer_price":590,"url":"https:\/\/www.havenholidaysnepal.com\/trips\/mardi-himal-trek-6-days"},{"name":"Mardi Himal Trek 7 days","duration":"7","image_url":"https:\/\/www.havenholidaysnepal.com\/storage\/trip-galleries\/58\/thumb_slider1.jpg0.61666600 1728206414.webp","offer_price":620,"url":"https:\/\/www.havenholidaysnepal.com\/trips\/mardi-himal-trek-7-days"},{"name":"Mardi Himal Trek 8 Days","duration":"8","image_url":"https:\/\/www.havenholidaysnepal.com\/storage\/trip-galleries\/59\/thumb_sli1.jpg0.38569100 1728206631.webp","offer_price":695,"url":"https:\/\/www.havenholidaysnepal.com\/trips\/mardi-himal-trek-8-days"},{"name":"14 Days Manaslu Trek","duration":"14","image_url":"https:\/\/www.havenholidaysnepal.com\/storage\/trip-galleries\/60\/thumb_sunrise-mt-manaslu-during-manaslu-circuit-larke-pass-trekking-himalaya-nepal (1)0.81855800 1738673284.webp","offer_price":885,"url":"https:\/\/www.havenholidaysnepal.com\/trips\/14-days-manaslu-trek"},{"name":"Dhampus-Sarangkot Trek with Chitwan 8 days","duration":"8","image_url":"https:\/\/www.havenholidaysnepal.com\/storage\/trip-galleries\/61\/thumb_Sarangkot Bhangyang.jpg0.75461400 1728210333.webp","offer_price":790,"url":"https:\/\/www.havenholidaysnepal.com\/trips\/dhampus-sarangkot-trek-with-chitwan-8-days"},{"name":"7 Days Golden Triangle Tour","duration":"7","image_url":"https:\/\/www.havenholidaysnepal.com\/storage\/trip-galleries\/62\/thumb_311ce1d117ee0ba75402a7c301bcdf830.73532400 1739179809.webp","offer_price":845,"url":"https:\/\/www.havenholidaysnepal.com\/trips\/7-days-golden-triangle-tour"},{"name":"Annapurna Circuit Trek 12 days","duration":"12","image_url":"https:\/\/www.havenholidaysnepal.com\/storage\/trip-galleries\/63\/thumb_IMG_20161024_092237.jpg0.57796600 1728289938.webp","offer_price":695,"url":"https:\/\/www.havenholidaysnepal.com\/trips\/annapurna-circuit-trek-12-days"},{"name":"Everest Base Camp Budget Trek 16 Days","duration":"16","image_url":"https:\/\/www.havenholidaysnepal.com\/storage\/trip-galleries\/64\/thumb_IMG_4423.JPG0.92579200 1728144669.webp","offer_price":958,"url":"https:\/\/www.havenholidaysnepal.com\/trips\/everest-base-camp-budget-trek-16-days"},{"name":"Poonhill Budget Trek 7 Days","duration":"7","image_url":"https:\/\/www.havenholidaysnepal.com\/storage\/trip-galleries\/65\/thumb_5be067852d0c5228d6f3155bc425c6b5.jpg","offer_price":395,"url":"https:\/\/www.havenholidaysnepal.com\/trips\/poonhill-budget-trek-7-days"},{"name":"Annapurna Base Camp Budget Trek 8 Days","duration":"8","image_url":"https:\/\/www.havenholidaysnepal.com\/storage\/trip-galleries\/66\/thumb_Pokhara.jpg0.16188000 1728212001.webp","offer_price":375,"url":"https:\/\/www.havenholidaysnepal.com\/trips\/annapurna-base-camp-budget-trek-8-days"},{"name":"The Real UNESCO Seven World Heritage Tour in Kathmandu 4 days","duration":"4","image_url":"https:\/\/www.havenholidaysnepal.com\/storage\/trip-galleries\/67\/thumb_Baudha Stupa.JPG0.63906900 1728201021.webp","offer_price":380,"url":"https:\/\/www.havenholidaysnepal.com\/trips\/the-real-unesco-seven-world-heritage-tour-in-kathmandu-4-days"},{"name":"Everest Base Camp Jeep Ride with Helicopter Return","duration":"14","image_url":"https:\/\/www.havenholidaysnepal.com\/storage\/trip-galleries\/68\/thumb_788ee5b63a6efb6f3c3d048b4270daca.JPG","offer_price":1895,"url":"https:\/\/www.havenholidaysnepal.com\/trips\/everest-base-camp-jeep-ride-with-helicopter-return"},{"name":"Annapurna Base Camp Jeep Ride with Helicopter Return 7 days","duration":"7","image_url":"https:\/\/www.havenholidaysnepal.com\/storage\/trip-galleries\/69\/thumb_abc jeep.jpg0.10280600 1728204064.webp","offer_price":1455,"url":"https:\/\/www.havenholidaysnepal.com\/trips\/annapurna-base-camp-jeep-ride-with-helicopter-return-7-days"},{"name":"Everest Base Camp Trek","duration":"15","image_url":"https:\/\/www.havenholidaysnepal.com\/storage\/trip-galleries\/70\/thumb_Everest Base Camp Trek 3 oct- 2024.JPG0.58445300 1727941472.webp","offer_price":1575,"url":"https:\/\/www.havenholidaysnepal.com\/trips\/everest-base-camp-trek"},{"name":"7 UNESCO World Heritage Tour Kathmandu 2 days","duration":"2","image_url":"https:\/\/www.havenholidaysnepal.com\/storage\/trip-galleries\/72\/thumb_Bhaktipur 3.jpg0.05559600 1728201496.webp","offer_price":150,"url":"https:\/\/www.havenholidaysnepal.com\/trips\/7-unesco-world-heritage-tour-kathmandu-2-days"},{"name":"Day Tour to UNESCO Heritage Sites","duration":"1","image_url":"https:\/\/www.havenholidaysnepal.com\/storage\/trip-galleries\/73\/thumb_228A1018.jpg0.79892500 1728199793.webp","offer_price":55,"url":"https:\/\/www.havenholidaysnepal.com\/trips\/day-tour-to-unesco-heritage-sites"},{"name":"Golden Triangle Tour in Nepal","duration":"8","image_url":"https:\/\/www.havenholidaysnepal.com\/storage\/trip-galleries\/74\/thumb_f54139cf9100f00015ffe0400687e946.webp","offer_price":588,"url":"https:\/\/www.havenholidaysnepal.com\/trips\/golden-triangle-tour-in-nepal"},{"name":"Everest Base Camp Honeymoon Tour by Helicopter with Pokhara","duration":"7 days","image_url":"https:\/\/www.havenholidaysnepal.com\/storage\/trip-galleries\/76\/thumb_RJTL7517.JPEG0.40261600 1731499989.webp","offer_price":9999,"url":"https:\/\/www.havenholidaysnepal.com\/trips\/everest-base-camp-honeymoon-tour-by-helicopter-with-pokhara"},{"name":"Yoga and Meditation Retreat Tour in Nepal","duration":"10 days","image_url":"https:\/\/www.havenholidaysnepal.com\/storage\/trip-galleries\/77\/thumb_decf8e33-6617-4400-9df0-63bf75509adf.JPG0.51948300 1731574810.webp","offer_price":2575,"url":"https:\/\/www.havenholidaysnepal.com\/trips\/yoga-and-meditation-retreat-tour-in-nepal"},{"name":"Chisapani-Nagarkot Trek","duration":"3","image_url":"https:\/\/www.havenholidaysnepal.com\/storage\/trip-galleries\/78\/thumb_0b64dfceaeab48ac36d685476bdebafb.webp","offer_price":165,"url":"https:\/\/www.havenholidaysnepal.com\/trips\/chisapani-nagarkot-trek"},{"name":"Chitwan Jungle Safari Tour","duration":"2","image_url":"https:\/\/www.havenholidaysnepal.com\/storage\/trip-galleries\/79\/thumb_IMG_1696.JPG0.28467800 1733054554.webp","offer_price":175,"url":"https:\/\/www.havenholidaysnepal.com\/trips\/chitwan-jungle-safari-tour"},{"name":"Kailash Overland Tour","duration":"16","image_url":"https:\/\/www.havenholidaysnepal.com\/storage\/trip-galleries\/80\/thumb_PA2605230.68496700 1735818657.webp","offer_price":2495,"url":"https:\/\/www.havenholidaysnepal.com\/trips\/kailash-overland-tour"},{"name":"4 nights 5 days Bhutan Tour","duration":"5","image_url":"https:\/\/www.havenholidaysnepal.com\/storage\/trip-galleries\/81\/thumb_PB0508470.23069500 1735828937.webp","offer_price":1265,"url":"https:\/\/www.havenholidaysnepal.com\/trips\/4-nights-5-days-bhutan-tour"},{"name":"Everest Base Camp Trek Without Flying","duration":"16","image_url":"https:\/\/www.havenholidaysnepal.com\/storage\/trip-galleries\/82\/thumb_308b054484eddc042e092e1ae2ae5586.webp","offer_price":685,"url":"https:\/\/www.havenholidaysnepal.com\/trips\/everest-base-camp-trek-without-flying"},{"name":"Everest Base Camp Trek by Land","duration":"16","image_url":"https:\/\/www.havenholidaysnepal.com\/storage\/trip-galleries\/83\/thumb_8f0f2784a3ae7343d193b64fe8d47c96.webp","offer_price":675,"url":"https:\/\/www.havenholidaysnepal.com\/trips\/everest-base-camp-trek-by-land"},{"name":"Everest Base Camp Trek by Jeep","duration":"16","image_url":"https:\/\/www.havenholidaysnepal.com\/storage\/trip-galleries\/84\/thumb_f82b3acdfc933bc3e0197624c001b0a6.webp","offer_price":675,"url":"https:\/\/www.havenholidaysnepal.com\/trips\/everest-base-camp-trek-by-jeep"},{"name":"Everest Base Camp Trek without Lukla Flight","duration":"16","image_url":"https:\/\/www.havenholidaysnepal.com\/storage\/trip-galleries\/85\/thumb_2d0acc76dc958e3122a3745074989914.webp","offer_price":675,"url":"https:\/\/www.havenholidaysnepal.com\/trips\/everest-base-camp-trek-without-lukla-flight"},{"name":"Langtang Valley Trek","duration":"7","image_url":"https:\/\/www.havenholidaysnepal.com\/storage\/trip-galleries\/86\/thumb_a845db06c5feada1478e8aed659fce97.webp","offer_price":199,"url":"https:\/\/www.havenholidaysnepal.com\/trips\/langtang-valley-trek"},{"name":"Everest Base Camp Trek with Gokyo Lake","duration":"17","image_url":"https:\/\/www.havenholidaysnepal.com\/storage\/trip-galleries\/87\/thumb_c6aa32f7654f2eda78134bc84ac70b79.webp","offer_price":1885,"url":"https:\/\/www.havenholidaysnepal.com\/trips\/everest-base-camp-trek-with-gokyo-lake"},{"name":"Everest Three Passes Trek","duration":"19","image_url":"https:\/\/www.havenholidaysnepal.com\/storage\/trip-galleries\/88\/thumb_db5364eaab56f5755da55868f8ca4258.webp","offer_price":1735,"url":"https:\/\/www.havenholidaysnepal.com\/trips\/everest-three-passes-trek"},{"name":"Annapurna Base Camp Trek From Pokhara","duration":"5","image_url":"https:\/\/www.havenholidaysnepal.com\/storage\/trip-galleries\/89\/thumb_49c813cf1054ff06108963924a78ee88.webp","offer_price":255,"url":"https:\/\/www.havenholidaysnepal.com\/trips\/annapurna-base-camp-trek-from-pokhara"},{"name":"Sarangkot Sunrise Tour from Pokhara","duration":"1","image_url":"https:\/\/www.havenholidaysnepal.com\/storage\/trip-galleries\/90\/thumb_932d995b8fb702634a23e8f9a0432c6e.webp","offer_price":35,"url":"https:\/\/www.havenholidaysnepal.com\/trips\/sarangkot-sunrise-tour-from-pokhara"},{"name":"Langtang Valley Trek-8 days","duration":"8","image_url":"https:\/\/www.havenholidaysnepal.com\/storage\/trip-galleries\/91\/thumb_81d3d0a6979c9ed01f65d5ade53820b2.webp","offer_price":250,"url":"https:\/\/www.havenholidaysnepal.com\/trips\/langtang-valley-trek-8-days"},{"name":"Manaslu Circuit Trek 12 days","duration":"12","image_url":"https:\/\/www.havenholidaysnepal.com\/storage\/trip-galleries\/92\/thumb_d8251bbef0c8a246a02bda5c150a27c2.webp","offer_price":675,"url":"https:\/\/www.havenholidaysnepal.com\/trips\/manaslu-circuit-trek-12-days"},{"name":"2 Days Poon Hill Trek","duration":"2","image_url":"https:\/\/www.havenholidaysnepal.com\/storage\/trip-galleries\/93\/thumb_9d8fa8f60767538857d6c7cb3a7fee8b.webp","offer_price":150,"url":"https:\/\/www.havenholidaysnepal.com\/trips\/2-days-poon-hill-trek"},{"name":"Upper Mustang Jeep Tour","duration":"6","image_url":"https:\/\/www.havenholidaysnepal.com\/storage\/trip-galleries\/94\/thumb_9a3098a6c860b87ad3339773ef5435b9.webp","offer_price":1095,"url":"https:\/\/www.havenholidaysnepal.com\/trips\/upper-mustang-jeep-tour"},{"name":"Tsum Valley Trek","duration":"11","image_url":"https:\/\/www.havenholidaysnepal.com\/storage\/trip-galleries\/95\/thumb_704a6a1eb293553827633dbd8ad7d22c.webp","offer_price":775,"url":"https:\/\/www.havenholidaysnepal.com\/trips\/tsum-valley-trek"},{"name":"Mardi Himal Trek from Pokhara","duration":"4","image_url":"https:\/\/www.havenholidaysnepal.com\/storage\/trip-galleries\/96\/thumb_c92e9ee49c2564a11c7a9ba593439efc.webp","offer_price":295,"url":"https:\/\/www.havenholidaysnepal.com\/trips\/mardi-himal-trek-from-pokhara"},{"name":"4 Days Poon Hill Trek","duration":"4","image_url":"https:\/\/www.havenholidaysnepal.com\/storage\/trip-galleries\/97\/thumb_c349e182edd0858f3e3409d945f0d2ec.webp","offer_price":215,"url":"https:\/\/www.havenholidaysnepal.com\/trips\/4-days-poon-hill-trek"},{"name":"Poon Hill Sunrise Jeep Tour from Pokhara","duration":"2","image_url":"https:\/\/www.havenholidaysnepal.com\/storage\/trip-galleries\/98\/thumb_509875052b16f6f9156db386e3592eb8.webp","offer_price":260,"url":"https:\/\/www.havenholidaysnepal.com\/trips\/poon-hill-sunrise-jeep-tour-from-pokhara"},{"name":"Muktinath Jeep Tour from Pokhara","duration":"3","image_url":"https:\/\/www.havenholidaysnepal.com\/storage\/trip-galleries\/99\/thumb_1651790cb7422703fe86d472a35d4f90.webp","offer_price":255,"url":"https:\/\/www.havenholidaysnepal.com\/trips\/muktinath-jeep-tour-from-pokhara"},{"name":"Ghorepani Poon Hill Trek from Pokhara","duration":"5","image_url":"https:\/\/www.havenholidaysnepal.com\/storage\/trip-galleries\/100\/thumb_27fa62452af4ea8e08544aaa035cc446.webp","offer_price":295,"url":"https:\/\/www.havenholidaysnepal.com\/trips\/ghorepani-poon-hill-trek-from-pokhara"},{"name":"Ghandruk, Poon Hill, Muktinath and Upper Mustang Tour","duration":"7 days","image_url":"https:\/\/www.havenholidaysnepal.com\/storage\/trip-galleries\/101\/thumb_a7dd15032cd9693005233b1df7dc63d3.webp","offer_price":685,"url":"https:\/\/www.havenholidaysnepal.com\/trips\/ghandruk-poon-hill-muktinath-and-upper-mustang-tour"},{"name":"Nar Phu Valley Trek with Annapurna Circuit","duration":"16 days","image_url":"https:\/\/www.havenholidaysnepal.com\/storage\/trip-galleries\/102\/thumb_21f5af1d6f698a6898b64413bcc19c69.webp","offer_price":1395,"url":"https:\/\/www.havenholidaysnepal.com\/trips\/nar-phu-valley-trek-with-annapurna-circuit"},{"name":"Poon Hill-Jhino Danda Hot Spring Trek","duration":"4","image_url":"https:\/\/www.havenholidaysnepal.com\/storage\/trip-galleries\/103\/thumb_b1a8563edaf102468aab613332282c6c.webp","offer_price":215,"url":"https:\/\/www.havenholidaysnepal.com\/trips\/poon-hill-jhino-danda-hot-spring-trek"},{"name":"Annapurna Base Camp Trek with Helicopter Return","duration":"4","image_url":"https:\/\/www.havenholidaysnepal.com\/storage\/trip-galleries\/104\/thumb_928d650987e2db5f449127b41966da53.webp","offer_price":895,"url":"https:\/\/www.havenholidaysnepal.com\/trips\/annapurna-base-camp-trek-with-helicopter-return"},{"name":"Annapurna Circuit with Tilicho Lake Trek","duration":"10","image_url":"https:\/\/www.havenholidaysnepal.com\/storage\/trip-galleries\/105\/thumb_a8c9d8bf4041c0fa676d6c239abfd24c.webp","offer_price":615,"url":"https:\/\/www.havenholidaysnepal.com\/trips\/annapurna-circuit-with-tilicho-lake-trek"}]
Why Everest Trekking in Nepal Captivates Adventurers Worldwide
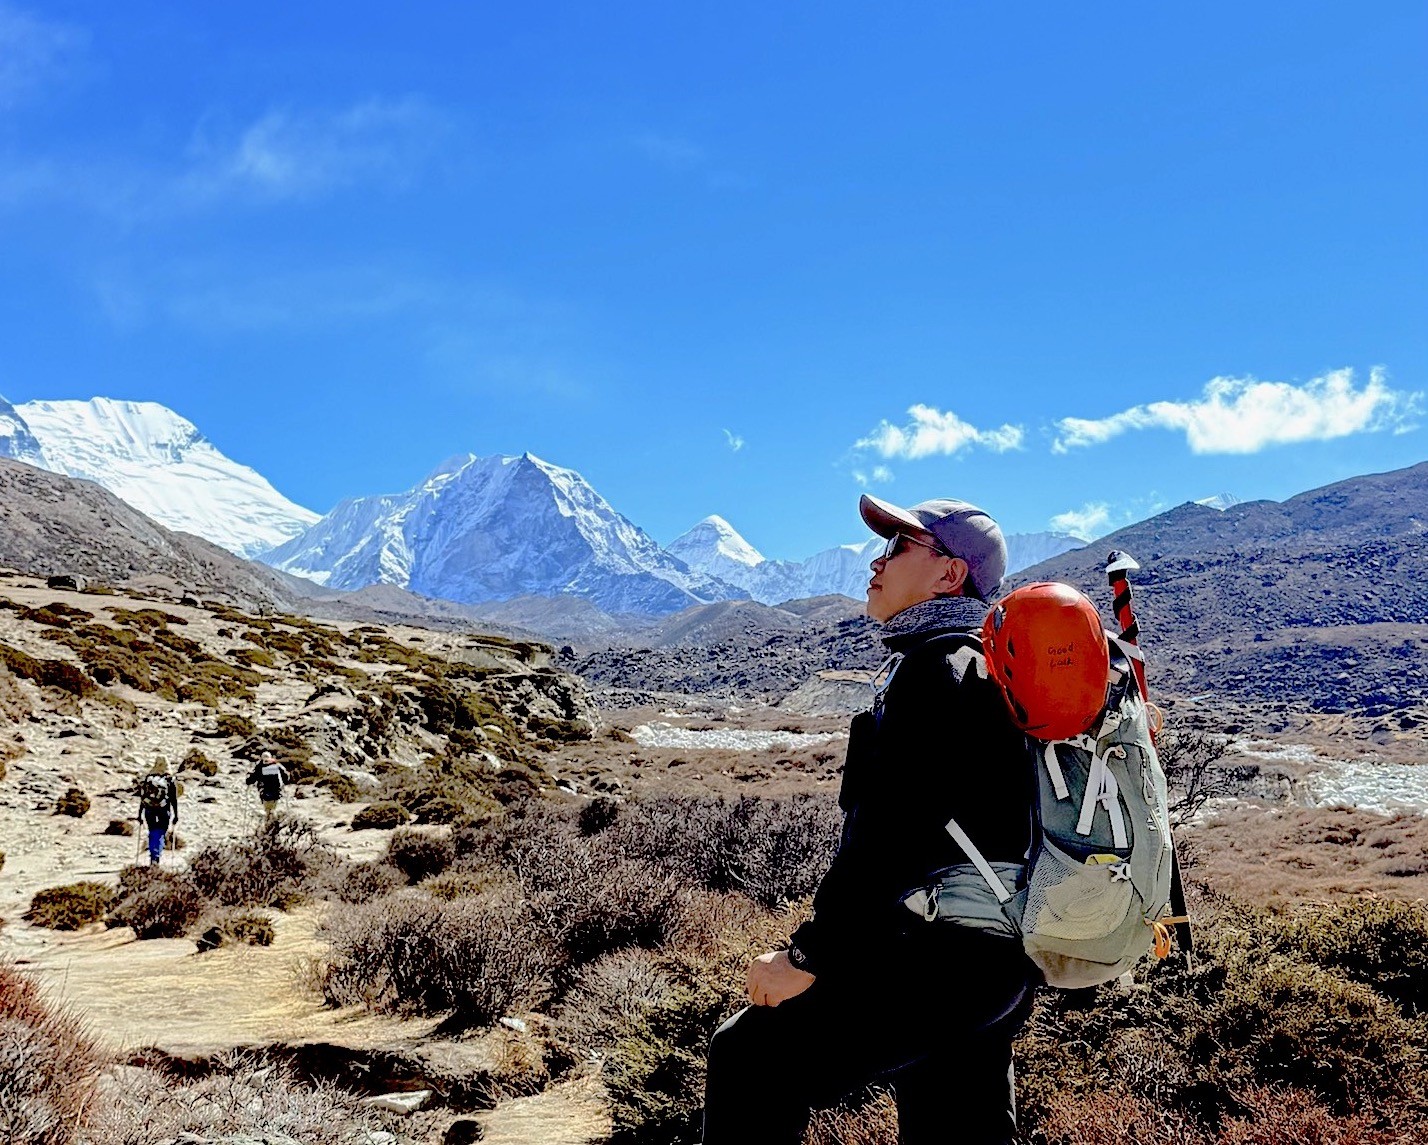
Meanwhile, Everest trekking in Nepal isn’t just a trip—it’s a call to adventure that draws people from all over the world. There’s something about standing among the tallest peaks on earth, surrounded by the wild beauty of the Himalayas, that sparks something deep inside you. Mount Everest, towering at 8,848 meters, isn’t just a mountain. For a lot of people, it’s a symbol of what humans can reach for and, sometimes, even touch.
But it’s not just about the mountains. The Sherpa culture makes this journey unforgettable. You’ll meet people whose warmth and traditions go back centuries. Sherpa villages like Namche Bazaar, with their markets and monasteries, feel like a different world. Trekking here pulls you through rhododendron forests, past rushing rivers, and up into the thin air where every step takes effort and grit. It tests you, and you come out stronger. The memories stick with you for life.
Moreover, the Sherpas themselves are a huge part of what makes this place special. Local guides fill the days with stories—legends about climbers like Tenzing Norgay, or quiet chats in cozy teahouses over plates of yak stew. Sunrise at Kala Patthar (5,545 meters) is a moment you’ll never forget, when Everest glows gold and pink. It’s the kind of experience that goes way beyond just hiking; it’s a deep dive into a culture that’s shaped by the mountain itself.
Likewise, nature lovers get hooked, too. Sagarmatha National Park is full of rare wildlife—snow leopards, red pandas, all living in these wild, untouched places. Glacial lakes and tumbling icefalls pop up around every corner. Trekkers here learn to travel light and leave no trace. That respect for the land draws in travelers who want something real, something lasting.
And yes, Everest trekking can fit different budgets. You can get a basic 14-day Everest Base Camp package for about $1,200, which covers permits and guides. If you want a bit more comfort, there are luxury options that include things like helicopter rides for around $2,500. But the real value is in the experience itself—especially the moments you share with the Sherpa community, which don’t cost extra.
Here, people come for the views, but they leave changed. Pushing past altitude headaches and tough trails builds real confidence. Staring up at the mountains puts life in perspective. Sharing meals and stories with the Sherpas teaches you about humility and community. This trek doesn’t just challenge your body—it shapes your character.
In the end, it’s the mix of magic, culture, and jaw-dropping scenery that keeps Everest trekking at the top of so many bucket lists. More than 50,000 people make the journey to Everest Base Camp every year. Friendships form along the trail, and Sherpa guides keep everyone safe—and honest. That’s why, for adventurers everywhere, there’s just nothing else like it.
Key Attractions That Captivate Adventurers
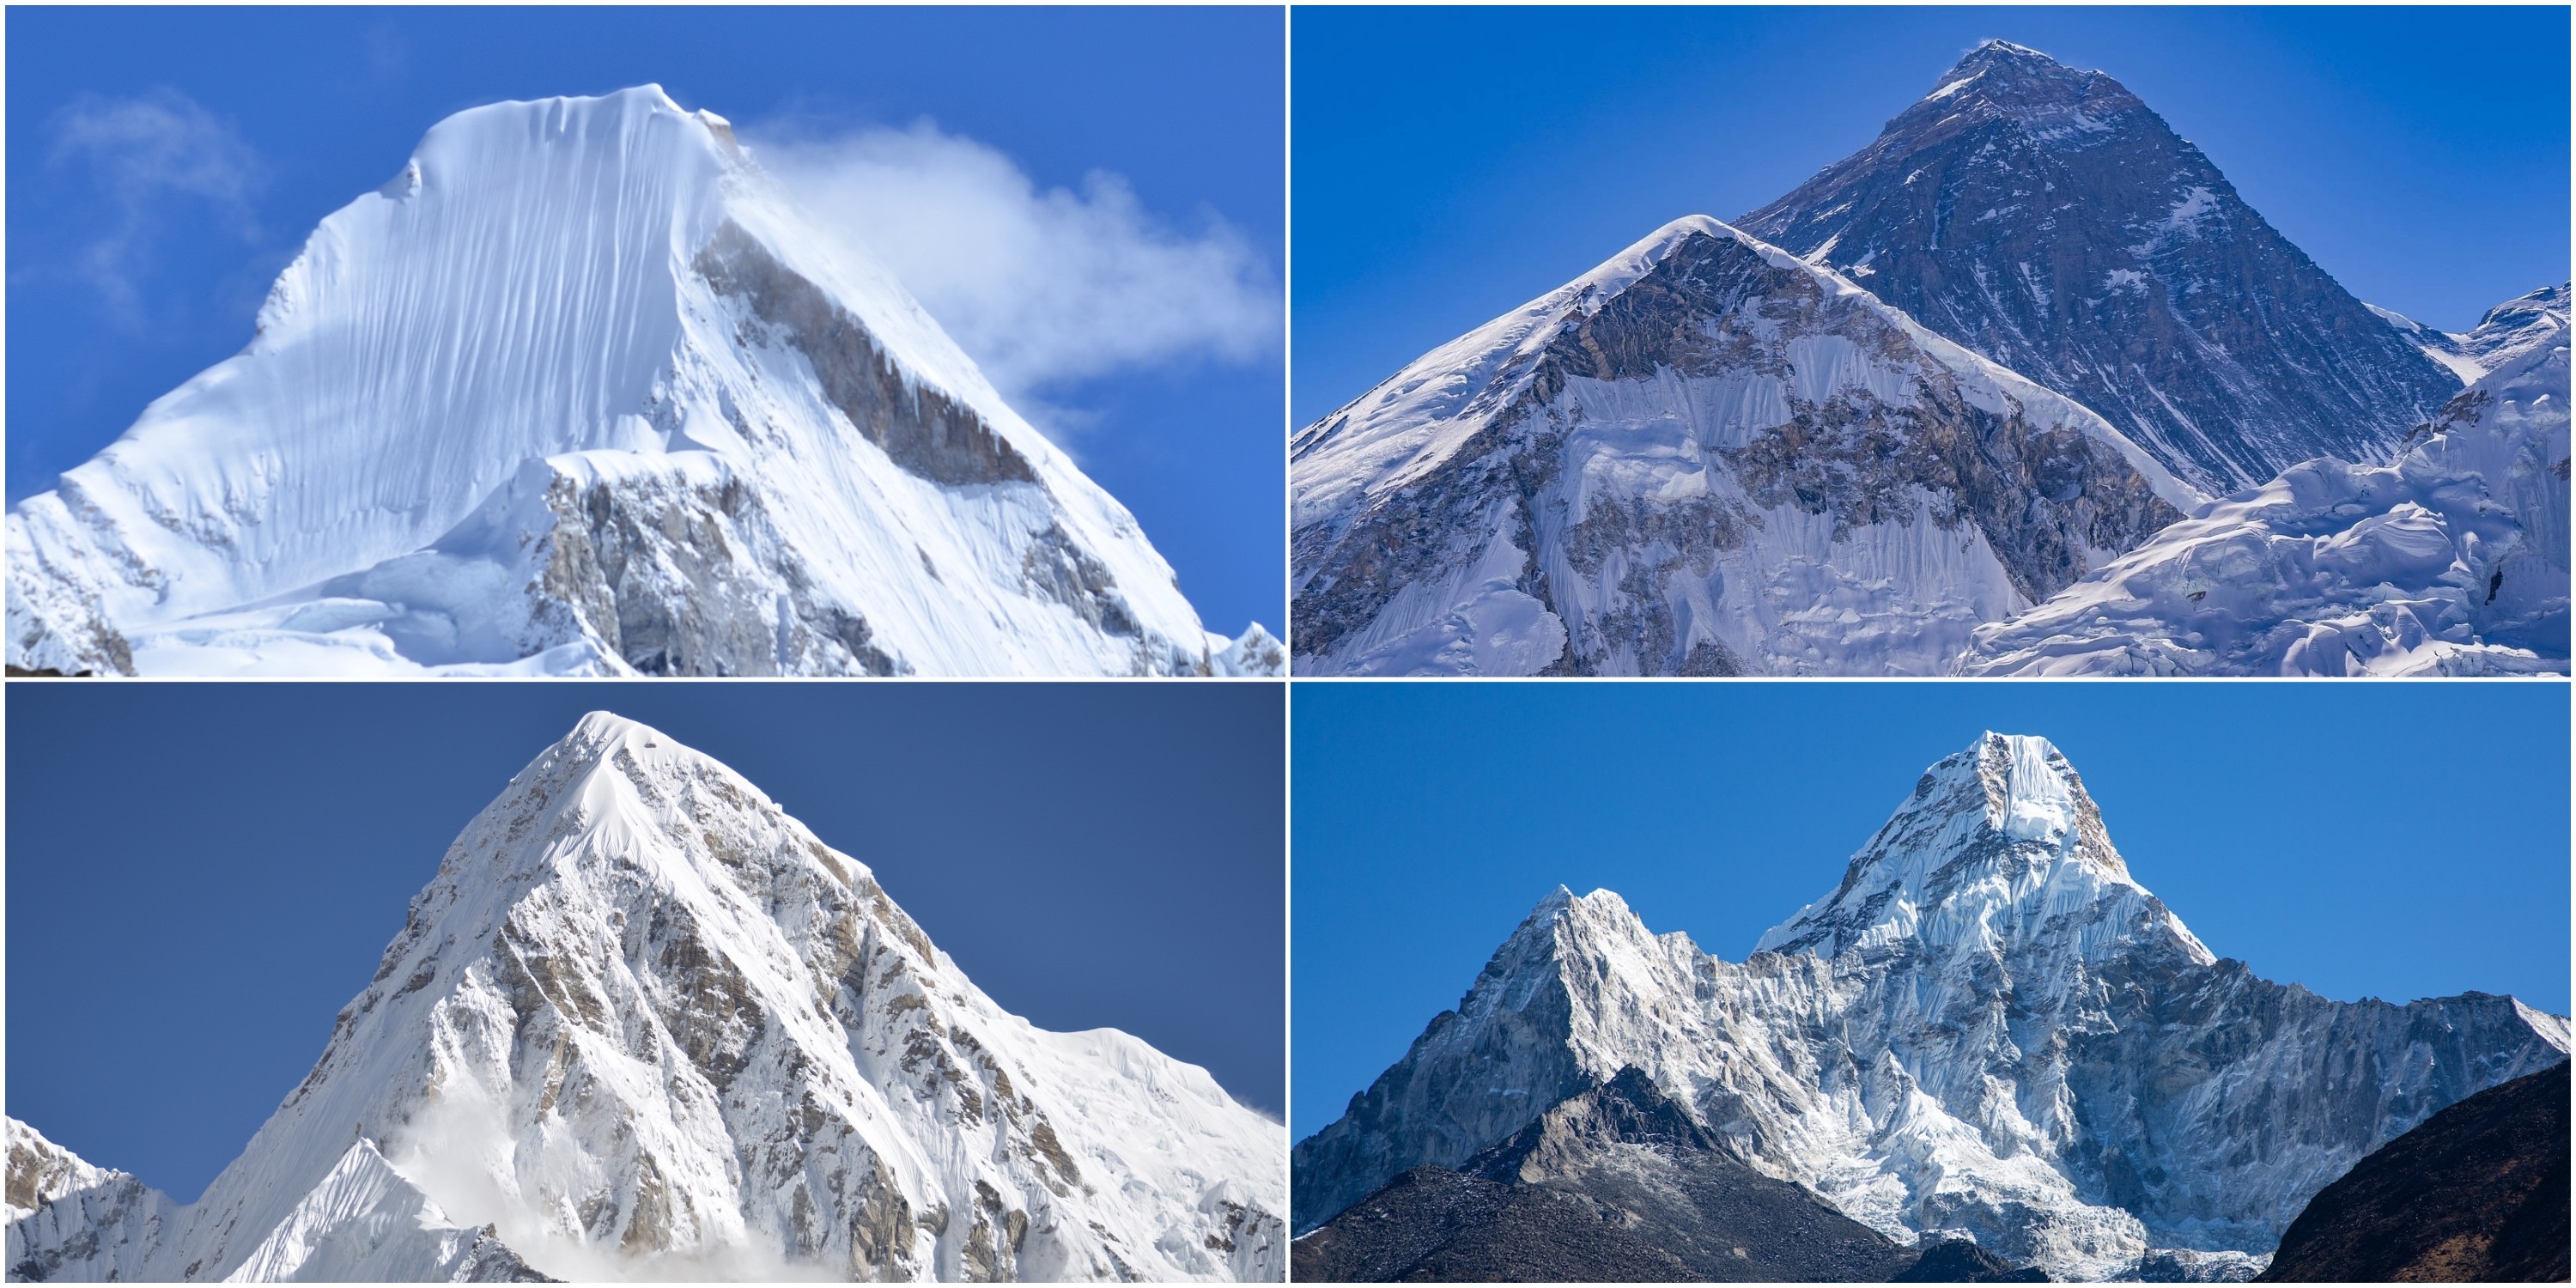
Iconic Himalayan Views: Panoramic sights of Mount Everest (8,848 m), Lhotse (8,516 m), and Ama Dablam (6,812 m) from high vantage points.
Sherpa Culture Immersion: Interact with local communities in villages like Tengboche (3,860 m), learning about Buddhist monasteries and festivals.
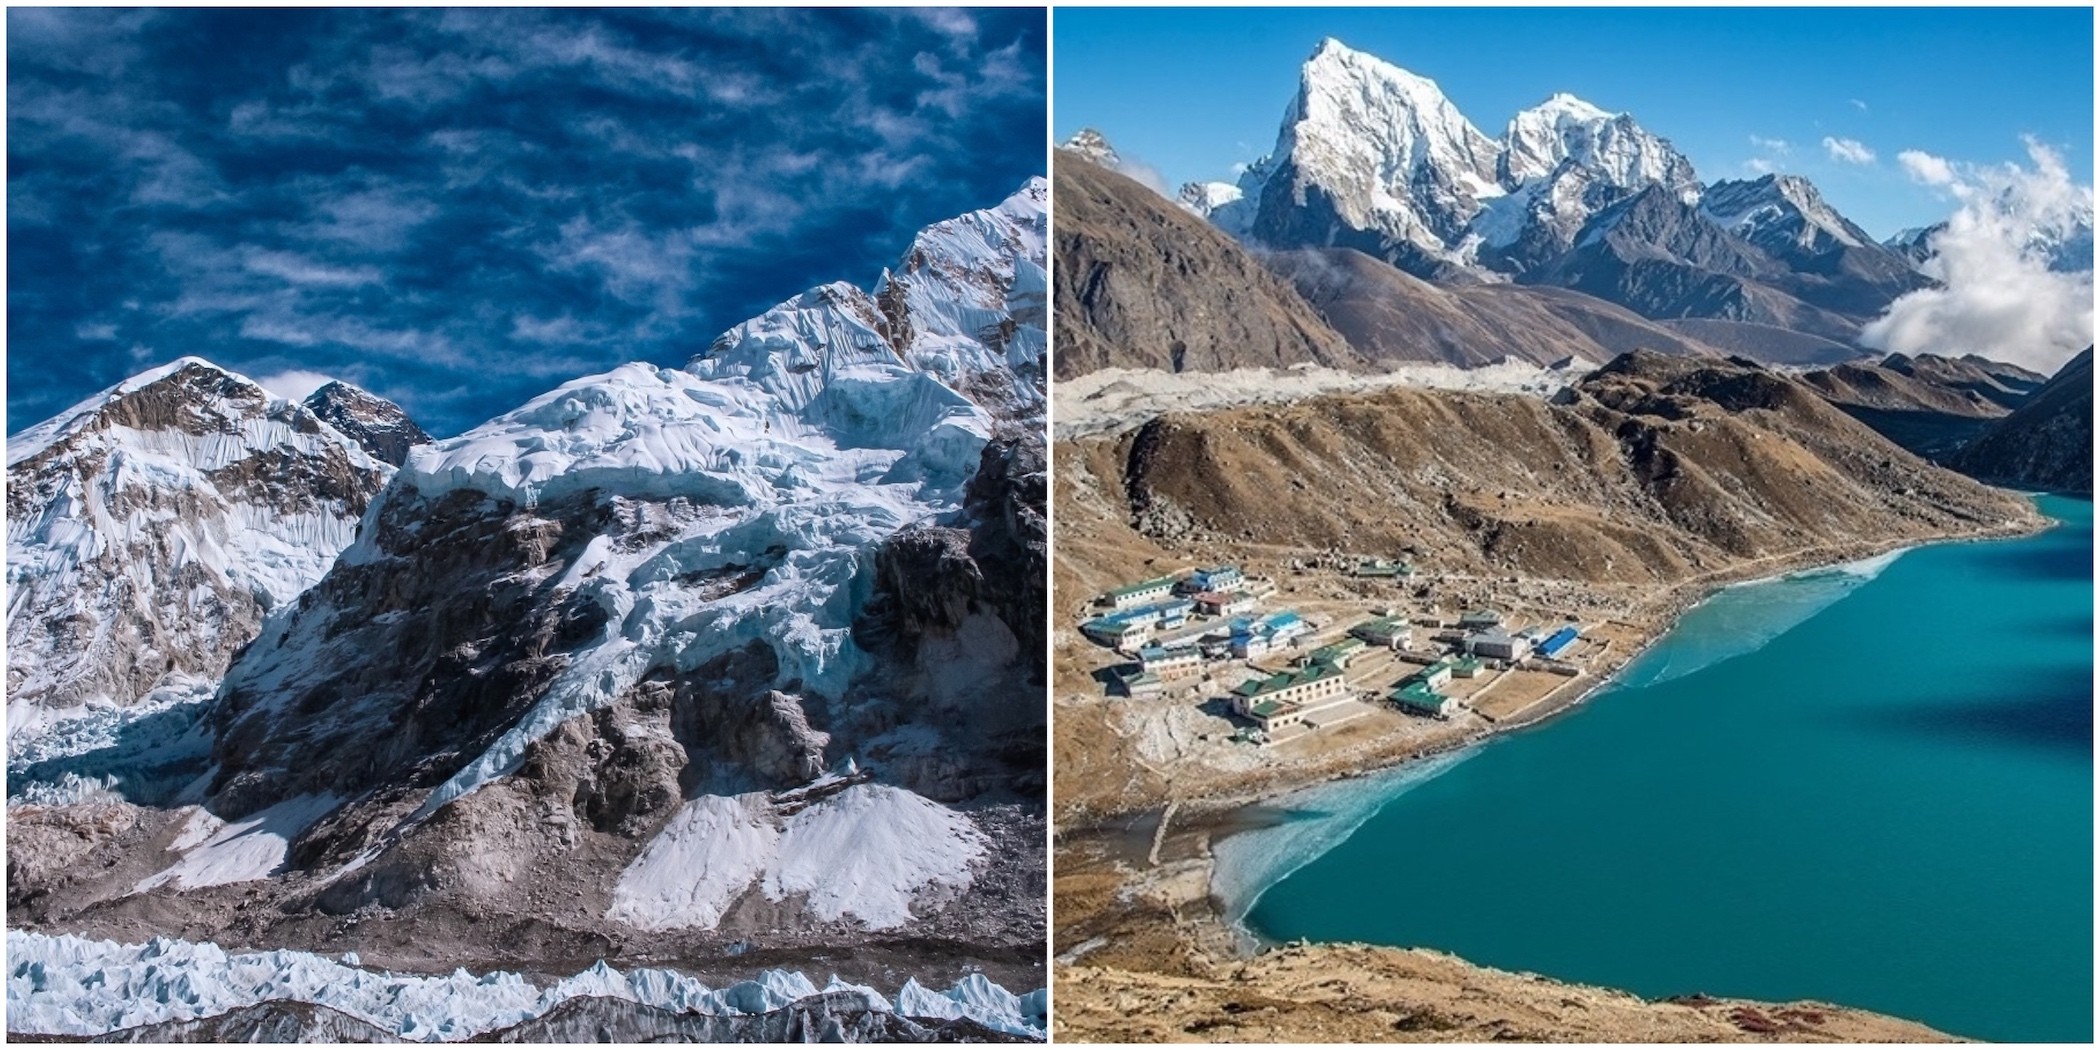
Magical Natural Wonders: Explore turquoise Gokyo Lakes (4,790 m) and Khumbu Glacier amid diverse flora and fauna.
Adventure Challenges: High-altitude hikes test endurance, offering personal triumphs in Nepal's Everest region.
Understanding the Main Everest Trekking Routes
Let’s talk about the main trekking routes to Everest trekking Nepal—the classic EBC, Gokyo Lakes, the Three Passes, and some combinations. I’ll walk you through elevations, costs, and handy tips for your Himalayan adventure.
Here, most people start with the classic Everest Base Camp (EBC) trek. It’s a direct shot to the world’s tallest mountain, starting from Lukla at 2,860 meters. From there, you climb up through the bustling Namche Bazaar (3,440 m), then on to Tengboche (3,860 m), where the famous monastery sits surrounded by jaw-dropping views. The trail keeps building the excitement as you head toward EBC itself at 5,364 meters. The whole journey usually takes 12 to 14 days, and you’ll get those legendary Himalayan panoramas you see in all the photos.
After Namche, you continue to Dingboche (4,410 m) for some much-needed acclimatization. Then it’s up to Lobuche (4,940 m), passing memorial stupas along the way. The last push takes you to Gorak Shep (5,164 m), just before the Base Camp. If you want the best view of Everest, climb Kala Patthar (5,545 m)—nothing beats it. The classic EBC trek is accessible for most hikers and packs in a real sense of adventure.
Budget-wise, expect to spend between $1,200 and $2,000 per person for the classic route. That covers permits—like Sagarmatha National Park ($25) and Khumbu Municipality ($15)—plus guides and porters, who are a huge help and bring peace of mind. Teahouse stays keep costs reasonable. Plan ahead and your money goes further, letting you relax and enjoy the trek.
Moreover, if you’re in the mood for something different, the Gokyo Lakes trek is a gorgeous alternative. Instead of heading straight to EBC, you’ll branch off from Namche Bazaar toward Dole (4,110 m) and Machhermo (4,470 m), ending up at the stunning turquoise Gokyo Lakes (4,790 m). Climb Gokyo Ri (5,357 m) for unbeatable views of Cho Oyu (8,188 m) and Makalu (8,485 m). This route is all about peaceful beauty and fewer crowds.
Want even more adventure? You can link Gokyo Lakes with the Cho La Pass (5,420 m) and rejoin the EBC trail. This combo adds excitement without the full challenge of the Three Passes circuit and usually takes 15 to 17 days. The Ngozumpa Glacier along the way is especially impressive. These mixed routes work for all kinds of fitness levels.
Now, for trekkers craving a real challenge, the Three Passes Trek route is the ultimate test. You’ll cross Kongma La (5,535 m), Cho La (5,420 m), and Renjo La (5,360 m). The path starts like the classic EBC trek but loops through Chukhung (4,730 m) and Dzongla (4,830 m), winding through Gokyo Valley as well. It takes 18 to 21 days and covers all the major valleys—this is the full Everest experience.
In fact, for the Three Passes trek start at around $1,700 per person, mainly because it’s longer and heads into more remote areas. The permits are the same, but a professional guide is crucial for tackling those high passes safely. In return, you get a complete Himalayan adventure.
Furthermore, you can mix and match too—like EBC with Gokyo via the Cho La Pass, or even add a climb up Island Peak (6,189 m) if you’re feeling ambitious. These routes adapt to whatever you want out of the trek. Just make sure to acclimatize properly to avoid altitude sickness. When you plan well and choose the right route, your Everest trek becomes an unforgettable journey.
Lukla (2,860 m), EBC (5,364 m), Kala Patthar (5,545 m) | 1,200-2,000 | Direct Everest views, Sherpa villages.
Gokyo Lakes
14-16 days
Gokyo (4,790 m), Gokyo Ri (5,357 m) | 1,300-2,200 | Turquoise lakes, quieter paths.
Three Passes
18-21 days
Kongma La (5,535 m), Cho La (5,420 m), Renjo La (5,360 m) | 1,700-2,500 | High passes, full circuit.
Combinations (e.g., EBC + Gokyo)
15-20 days
Varies by mix | 1,400-2,300 | Customized adventures, multiple valleys.
Best Time to Trek in the Everest Region
If you’re planning a trek in the Everest region, timing really matters. Most people aim for spring or autumn—these seasons offer the best conditions and the clearest views. Spring runs from March to May; you get mild weather, blooming rhododendrons, and landscapes that feel alive. Around Namche Bazaar, the flowers go wild, and temperatures range from 15°C in the lower villages down to about -5°C higher up. Sure, you might get the odd shower, but snow is rare and the skies usually open up to those massive Himalayan peaks. No wonder the trails are full of nature lovers.
Then, there’s autumn—September through November. The air gets crisp, the skies stay clear, and the temperatures settle between 10-20°C during the day. Nights can be cold, especially up at Gorak Shep where it drops to -10°C, but the paths stay dry after the monsoon passes. No more leeches or slippery trails. Plus, local festivals like Dashain bring some extra energy to the villages. This is when everyone wants to be there.
Monsoon season though? June to August is a different story. Heavy rains sweep through, especially around Lukla, and landslides aren’t uncommon. Trails get messy, leeches come out, and the mountains often hide behind thick clouds. So, even if off-season discounts seem tempting, most trekkers skip these months for safety’s sake.
Here, winter, from December to February, is a quieter time. You’ll find solitude, but also harsh weather. Snow covers the higher trails above Dingboche, with temperatures dropping as low as -20°C. Blizzards can close passes like Cho La, and you really need to be prepared for cold snaps. Still, some experienced trekkers head out for the peace and empty trails.
In fact, the shoulder months—late February and early December—offer a bit of both worlds. Late February starts to warm up, hinting at spring, while early December cools off from autumn highs. If you’re aiming for these transitions, it helps to keep an eye on the weather with a good app and stay flexible in your plans.
One last thing: costs change with the seasons. During peak times, teahouse prices usually jump to $20-30 per night. In the off-season, you might find rooms for $10-15, but some places close. Permit fees hold steady at $40, but your budget will go farther if you plan around the busy months. So, it’s worth thinking about when you go, not just for the views, but for your wallet too.
Seasonal Highlights for Everest Trekking
Spring (March-May): Blooming flora, moderate crowds, clear mornings; ideal for photography at Tengboche (3,860 m).
Autumn (Sept-Nov): Stable weather, vibrant festivals, peak visibility; perfect for EBC (5,364 m) views.
Winter (Dec-Feb): Snowy solitude, lower costs, challenging conditions; suits hardy adventurers at Lobuche (4,940 m).
Monsoon (June-Aug): Heavy rains, landslides, obscured peaks; strongly avoid for safety in Khumbu Valley.
How Difficult Is Everest Trekking Really?
How tough is trekking to Everest, really? Well, it depends on a few things—your fitness, the route you pick, and how well you handle altitude. Most people say the classic Everest trek is moderate to strenuous, but it’s not some impossible feat. You’ll hike five to eight hours a day, usually on rocky, uneven paths, sometimes climbing endless stone steps or wobbling across suspension bridges. Once you pass 3,000 meters, the air gets thinner, and that’s when the altitude starts messing with you.
Now, let’s break it down. You don’t have to lug a massive backpack—porters usually carry the heavy stuff. But you still need to be able to walk long distances, day after day, with a smaller pack. Training helps. Likewise, cardio and leg workouts make a big difference, especially for those steep climbs up to places like Namche Bazaar. The biggest hurdle is the altitude. You can’t rush this trek for a reason—if you climb too fast, you risk getting sick. Headaches, nausea, and even more serious issues like HAPE can hit if you ignore acclimatization days. Most guides and hikers give the Everest Base Camp (EBC) trek about a 7 out of 10 for difficulty. You want to be sure your body’s ready, so getting a medical check beforehand just makes sense.
Moreover, not all Everest treks are created equal, though. The Three Passes trek is much tougher, scoring a 9 out of 10 because you’re crossing passes up to 5,535 meters, like Kongma La. The Gokyo Lakes trek is easier on the legs and lungs, maybe a 6 out of 10, but still no joke. Longer routes mean more days on the trail and more chances for things to get tough, so beginners usually stick to the classic EBC or even shorter options.
So, who actually should do this? Most healthy adults between 18 and 60 handle it fine, especially if they’re active and train a bit before coming. Teens do well if they’re used to hiking, and even some seniors make it to Base Camp if they take their time and know what to expect. If you’ve got heart or serious lung issues, though, altitude is risky—get a doctor’s advice first.
Similarly, preparation really is everything. Building up your fitness, especially leg strength, helps you tackle those climbs up to places like Kala Patthar. Staying hydrated and eating well keeps your energy up. Guided tours take a lot of the stress out of the experience, and having someone knowledgeable around makes a big difference if you start to feel off.
Here, cost-wise, some costs help make the trek easier. Guides usually charge around $25–$40 a day, and that’s money well spent. You might also want to budget for altitude medication like Diamox. Good gear is worth investing in—warm sleeping bags, solid boots, and layers for the cold. In the end, yeah, it’s challenging, but the payoff—standing in the shadow of Everest—is worth every step. If you’re committed and prepared, you can do it.
Aspect
Description
Difficulty Rating (1-10) | Suitability Tips
Physical Demands
Daily long hikes, steep inclines
7 | Train with cardio and strength exercises.
Altitude Challenges
AMS risks above 3,000 m
8 | Acclimatize, use meds, monitor symptoms.
Overall Route
Classic EBC vs. advanced passes
7-9 | Fit adults, avoid if health issues.
Preparation Needs
Gear, training, guides
N/A | Budget $1,500+ for supported treks.
Essential Preparation and Training Tips
If you want to trek to Everest, you’ve got to start preparing early—think 3 to 6 months before you even set foot in Nepal. This isn’t something you cram for at the last minute. You’ll need a steady fitness routine, with cardio and strength workouts as your bread and butter. That early start? It matters. The mountain isn’t going to wait for you to catch up, and building endurance ahead of time keeps you from getting sidelined by injuries on those steep, unforgiving trails.
Actually, cardio is a huge thing to practice for Everest trek in Nepal. You’ll see trekkers jogging, cycling, or hitting the stair climber for 30 to 60 minutes most days to get their lungs in shape. Brisk walks on hills are even better—they mimic the climbs up to places like Namche Bazaar at 3,440 meters. Throw in some practice hikes, too. You want your legs and lungs ready for the real thing.
Likewise, strength training is just as important. Squats, lunges, step-ups—these moves build up your legs, core, and back so you can carry your daypack all day. Three days a week at the gym isn’t overkill. Back exercises help you stay steady on uneven paths, and mixing up your workouts keeps things balanced. That’s how you fight off fatigue on the trail.
Here, don’t just repeat the same workout every week. You need to push yourself a little more each time—add some weight to your pack, go a little farther, tackle longer hikes on back-to-back days. Work your way up to 5-8 hour treks with a 10-15 kg pack. This way, your body adapts, and you’re not surprised by the challenge once you’re out there.
If you can, try to simulate the altitude and elevation gains. Stair climbers, hill repeats, anything that gets your heart pumping as you go up—these all help. Combine endurance and strength workouts, and don’t skip rest days. Your body needs time to recover, so don’t burn yourself out before the trek even begins.
Moreover, fuel matters, too. You’ll need good food and plenty of water to power your training. Lean into a balanced diet, keep your protein intake up for muscle repair, and drink more water than you think you need. It all adds up to better performance on the trail.
And don’t forget about your gear what to pack for Everest trekking in Nepal. Break in your boots during your training hikes—blisters are a nightmare at altitude. Test out your clothing layers and train in your full kit sometimes, so nothing feels new or uncomfortable when it counts. In the end, this kind of thorough preparation makes the journey not just doable, but actually enjoyable.
Strength Workouts: Squats, lunges, deadlifts, core exercises 3 times/week for leg and back power.
Hiking Practice: Weekly long hikes with weighted pack, increasing elevation gain over months.
Timeline: Start 3-6 months ahead; peak with back-to-back hikes 4-6 weeks before trek.
Permits, Visas, and Entry Requirements for Nepal
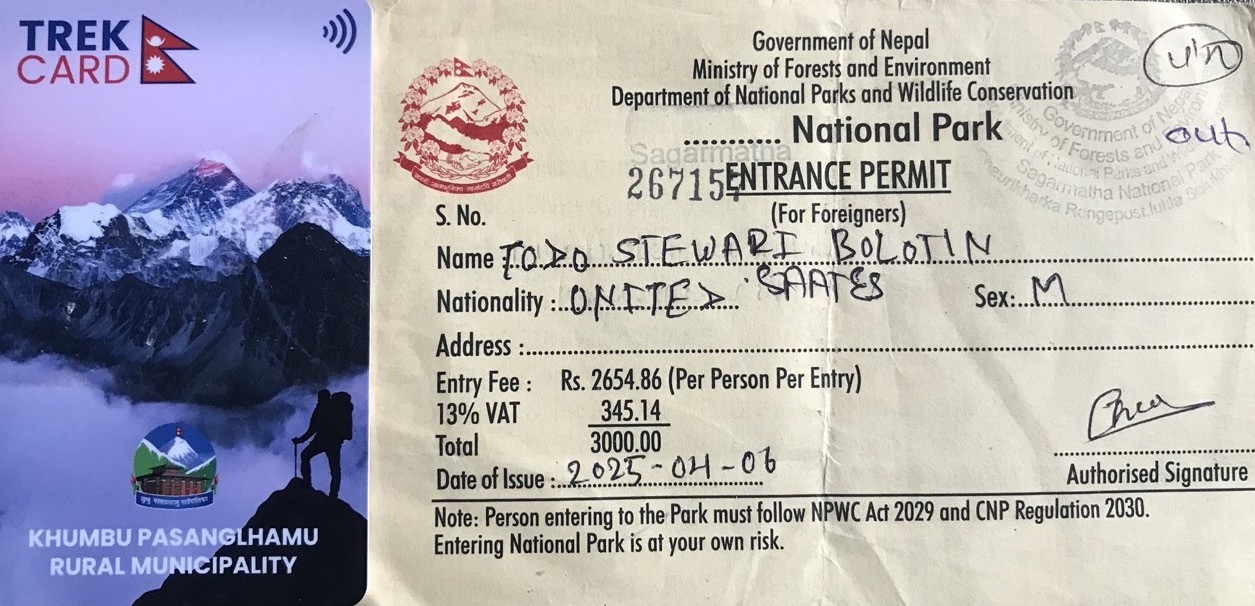
If you’re heading to Nepal for an Everest trek, you’ll need a few key documents: a tourist visa, the Sagarmatha National Park entry permit, and the Khumbu Pasang Lhamu Rural Municipality permit. The old TIMS card isn’t required anymore for the Everest region, so you can skip that step.
Here, let’s start with visas. Most travelers just grab a tourist visa when they land at Tribhuvan International Airport in Kathmandu, though you can also apply before your trip. The visa covers multiple entries, so you can come and go if you need to. Fees depend on how long you plan to stay, and you’ll need a passport that’s valid for at least six months.
Likewise, now for the permits for EBC Trek. First up, the Sagarmatha National Park entry permit. This one’s a must—no way around it—since you’ll be walking through a UNESCO World Heritage Site that includes Everest itself. You can pick up the permit in Kathmandu at the Nepal Tourism Board or at the Monjo checkpoint on the way into the park. The fee is around NPR 3,000 (about $25–30) for foreigners. That money helps protect the park and its wildlife.
In fact, the second essential permit is the Khumbu Pasang Lhamu Rural Municipality permit. This one replaced the old system a few years back and goes directly toward supporting local communities like Namche Bazaar. You can get it in Lukla or Monjo. Expect to pay NPR 2,000–3,000 ($20–23) per person. Again, it’s mandatory if you’re trekking in the Everest region.
No need to worry about the TIMS card anymore if you’re flying into Lukla for Everest Base Camp or Gokyo treks. The local permits cover tracking and safety, which actually makes the process simpler.
If you’re going with a trekking agency, they’ll usually handle all the paperwork. Still, bring a few passport photos and a copy of your passport just in case. Fees can change, so double-check the latest info online before you go. Permits are typically single-entry, so hang onto them while you’re on the trail.
All things considered, permits and visas don’t break the bank—figure on $50–80 total, not counting any visa extensions. The process is pretty straightforward, and the money goes toward keeping the region beautiful and supporting the people who live there. Show up prepared, and you’ll be set for an incredible adventure.
$25-30 (NPR 3,000) | Kathmandu NTB or Monjo | Mandatory for all Everest routes.
Khumbu Pasang Lhamu Rural Municipality Permit
Local community support
$20-23 (NPR 2,000-3,000) | Lukla or Monjo | Replaces TIMS; no TIMS required.
TIMS Card
Not applicable
N/A | N/A | Exempt in Everest region.
Getting to the Trailhead: Kathmandu to Lukla Flight Guide
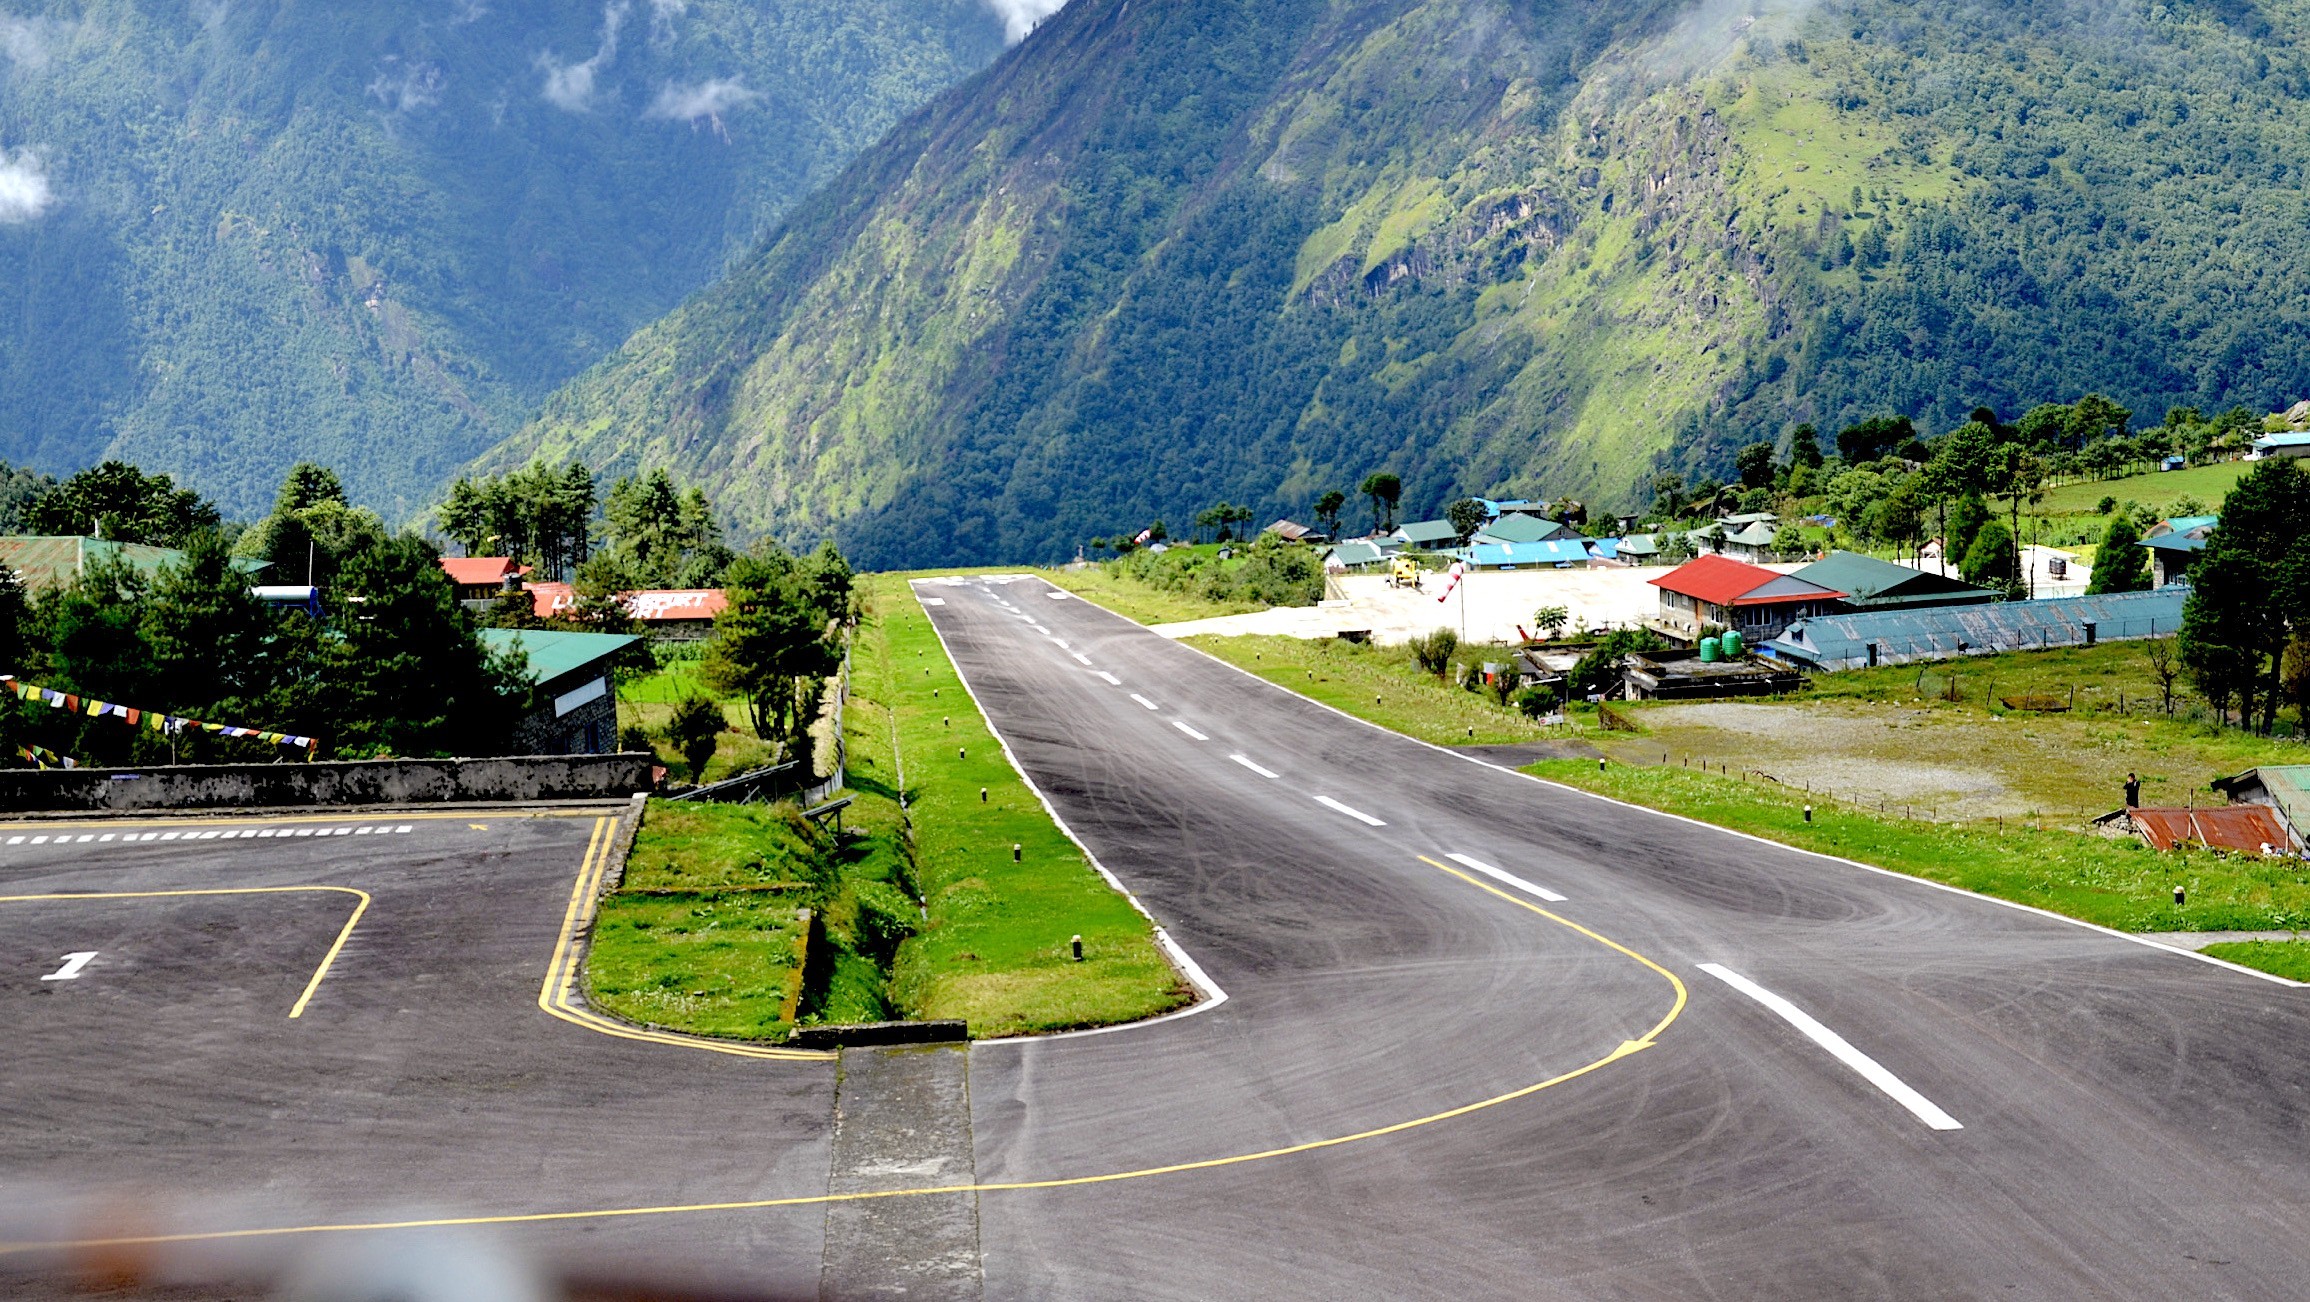
If you’re heading to Everest, the classic way in is by flying from Kathmandu to Lukla. It’s a quick 35-minute flight that starts your trek with jaw-dropping Himalayan views right out the window. Most flights leave from Tribhuvan International Airport in Kathmandu, with airlines like Tara Air and Summit Air handling the daily runs. It’s the fastest way to get your adventure going.
But things get crowded in peak trekking seasons, so flights often shift to Manthali Airport in Ramechhap, about 4-5 hours’ drive from Kathmandu. Yeah, it’s an early start and a bit of a detour, but it keeps things moving when Kathmandu’s too busy. Plenty of trekkers take this route, and it works well if you plan ahead.
Let’s talk money: in 2026, one-way flights from Kathmandu to Lukla run about $215-240 for foreigners. If you go via Ramechhap, it’s a bit less—figure $195-220, including a shared jeep from Kathmandu. The cheapest direct flights hover around $175, but those get snatched up fast, especially in busy months. Booking early makes a big difference if you’re watching your budget.
Likewise, weather throws a wrench in the works, though. Lukla’s airport is a tiny spot with a short runway—plus, it only allows landings and takeoffs in one direction. Clouds and wind can ground flights for hours or even days. Most people try to book the earliest flight possible, hoping to beat the afternoon weather. Flexibility matters. Build in some buffer days so a delay doesn’t wreck your whole plan.
When regular flights get canceled, helicopters step in. They can sometimes fly when planes can’t, but you’ll pay for it—tickets jump to $500 or more per person. Because of all this, most trekkers add a couple of extra days to their itinerary, just in case. Safety first.
Moreover, a few other things to keep in mind: pack light, since airlines limit baggage to 10-15 kg. Keep your passport and permits handy—they’ll check. And it helps to use weather apps to keep tabs on conditions. A little prep goes a long way toward a smooth start.
Sure, you can skip the flight and trek overland to Lukla, but it takes weeks. For this, one can get Kathmandu to Surke Jeep ride via Salleri and Thamdanda. Flying saves tons of time, and the Ramechhap option is a solid backup. One last tip: patience is key. Weather in the Himalayas always keeps you guessing, but if you plan smart, you’ll get to Everest’s doorstep without too much hassle.
Key Tips for Kathmandu to Lukla Flight :
Book in Advance: Secure tickets early during peak seasons (March-May, Sept-Nov) to avoid sell-outs.
Pack Light: Adhere to 10 kg checked + 5 kg hand luggage; excess fees apply.
Monitor Weather: Check forecasts daily; mornings offer best visibility at Tenzing-Hillary Airport (2,860 m).
Buffer Days: Add 1-2 extra days in itinerary for potential delays or cancellations.
Day-by-Day Everest Base Camp Trek Itinerary
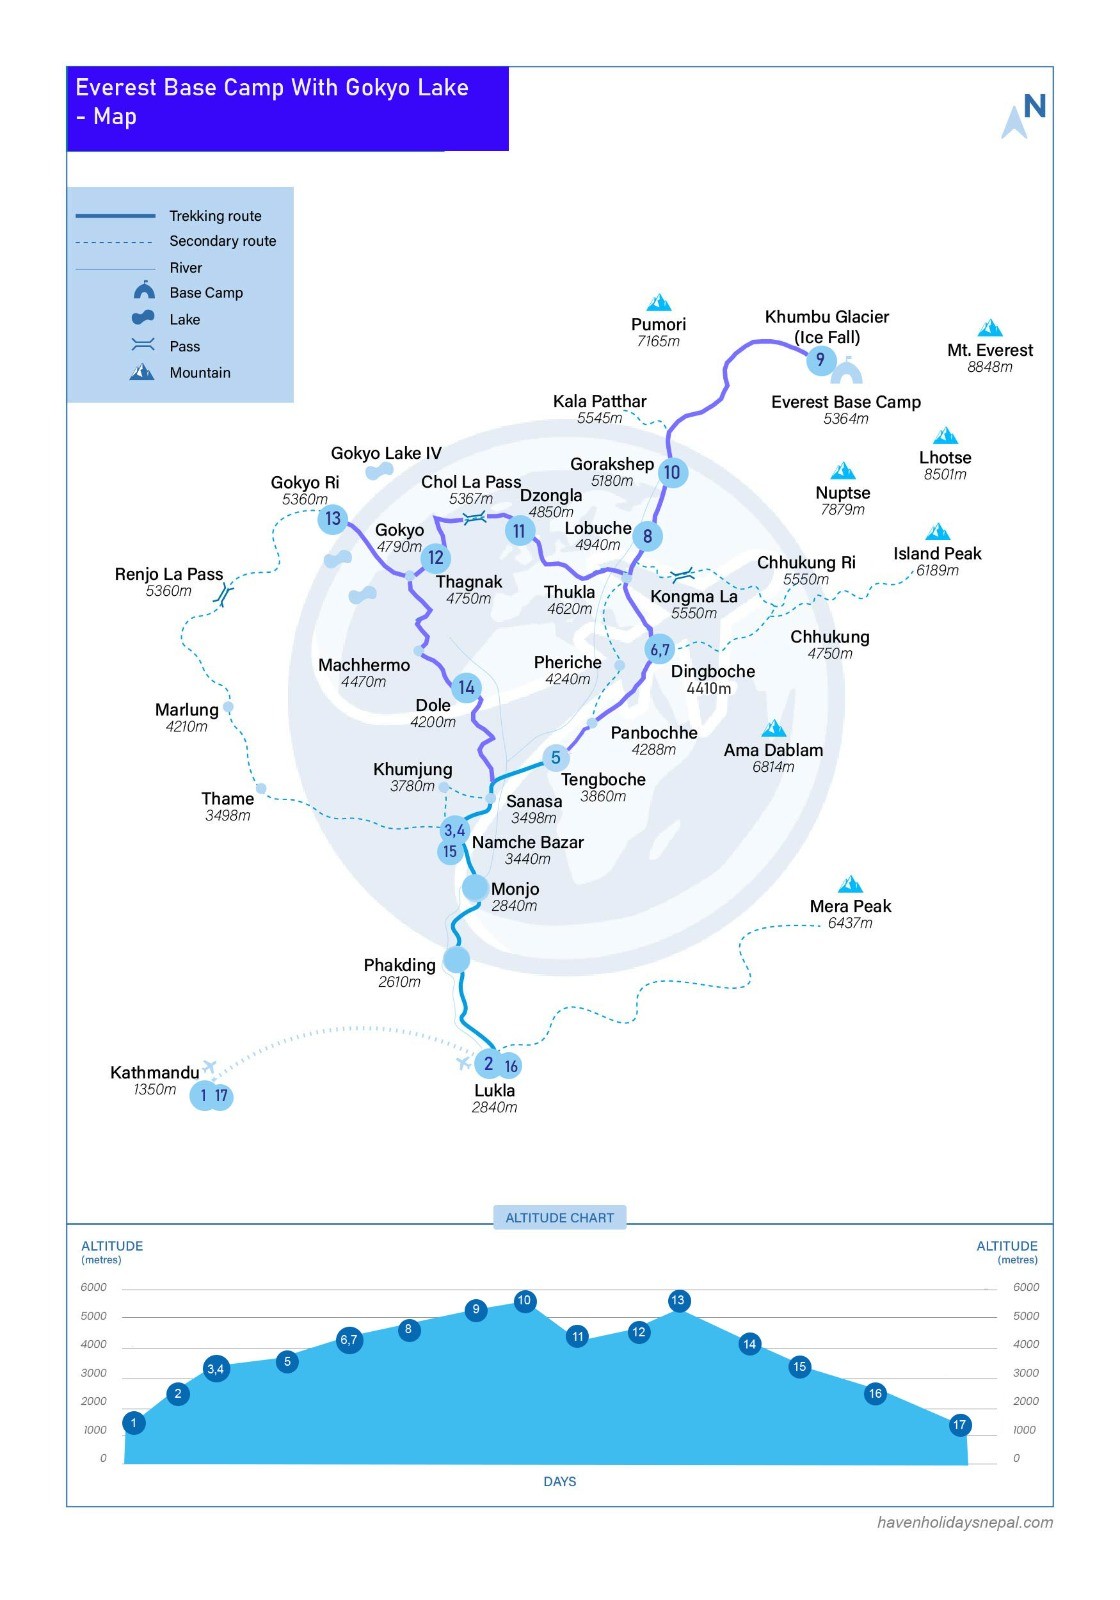
Here’s the classic Everest Base Camp trek, broken down day by day. You’ll start in Lukla and visit Phakding, Namche, Tengboche, Dingboche, Lobuche, Gorak Shep, Everest Base Camp, and Kala Patthar. I’ve included elevations and a few tips to help you make the most of this adventure in the Nepal Himalayas.
Likewise, you’ll need around 12 to 14 days for the whole trek, starting with your arrival in Kathmandu. On your second day, you’ll fly to Lukla (2,860 m) and begin your journey, climbing gradually through Sherpa villages. Key acclimatization stops are built in, so you’ll have a safer, smoother trip up to base camp.
Here, day 1 is all about resting up in Kathmandu (1,400 m). You might wander through old temples or double-check your gear—whatever gets you ready. On Day 2, the trek really begins. After flying into Lukla, you set off on foot to Phakding (2,610 m). The walk isn’t too tough—just a few hours, mostly downhill—so you can ease into things.
Likewise, day 3 takes you from Phakding up to Namche Bazaar (3,440 m), about five or six hours on the trail. You’ll cross wild suspension bridges and enter Sagarmatha National Park. On Day 4, you stay in Namche for an acclimatization day. Check out the market or take a short hike to a viewpoint. It’s a good chance to adjust to the altitude before moving higher.
Further, on Day 5, you’re off to Tengboche (3,860 m), about a five-hour hike. The views get bigger—Ama Dablam and Thamserku tower in the distance. Don’t miss Tengboche Monastery; it’s peaceful, and the setting is unreal. A bit of local culture before the real high-altitude challenge.
Moreover, day 6 brings you to Dingboche (4,410 m), winding through open valleys with huge peaks all around. You spend Day 7 here, too—another acclimatization day. Maybe do a side trek to Chhukung or Nagarjun to help your body get used to the altitude.
After that, Day 8 goes on to Lobuche (4,940 m). The landscape turns stark, with memorials and rocky moraines. On Day 9, you push to Gorak Shep (5,164 m)—the last stop before base camp. The air’s thin, and everyone’s buzzing with anticipation.
Day 10 is the big one: the trek to Everest Base Camp (5,364 m) and back to Gorak Shep. It’s long—six to eight hours—and you follow the Khumbu Glacier most of the way. Standing at base camp, staring up at the mountains, is something you’ll never forget. Early the next morning, Day 11, climb Kala Patthar (5,545 m) for sunrise views. It’s cold and tough, but the panorama is worth every step.
After that, it’s time to head down. Day 12 drops you to Pheriche or all the way back to Namche. The air feels thick again, and you’ll move faster. You’ll finish up with a flight out of Lukla on Day 13 or 14. Extra days come in handy for weather delays or if you want a little more rest.
All in all, this itinerary doesn’t just get you to Everest Base Camp—it makes the whole adventure safer, richer, and a lot more memorable.
11 km / 5-6 hrs | +830 m | Suspension bridges, entry to national park.
5
Namche → Tengboche (3,860 m)
10 km / 5 hrs | +420 m | Monastery, Ama Dablam views.
6
Tengboche → Dingboche (4,410 m)
11 km / 5-6 hrs | +550 m | Imja Khola valley, acclimatization prep
8
Dingboche → Lobuche (4,940 m)
10 km / 5 hrs | +530 m | Memorial stupas, glacial scenery
9-10
Lobuche → Gorak Shep (5,164 m) → EBC (5,364 m)
return | 14 km / 7-8 hrs | +424 m Glacier trek, Khumbu Icefall
11
Gorak Shep → Kala Patthar (5,545 m)→ Pheriche descent
15 km / 7 hrs | +381 m / descent | Sunrise Everest views, descend for safety
Acclimatization: How to Avoid Altitude Sickness on the Everest Trek
If you’re trekking to Everest, getting your body used to the thin air—acclimatization—matters way more than you might think. The golden rule here is “climb high, sleep low.” Basically, hike up higher in the day, then head down to sleep. It sounds simple, but it really helps your body adapt. That’s why everyone builds in rest days at spots like Namche Bazaar (3,440 m). You hang out, let your body catch up, and keep an eye on how you’re feeling.
In fact, the real trick is to pay attention to yourself. Altitude sickness creeps up fast if you ignore early warning signs—headaches, nausea, feeling wiped out for no reason. If things get worse—confusion, trouble breathing—you have to go down. No summit is worth risking your life.
When you’re above 3,000 meters, everything gets harder. Take it slow. Drink lots of water, don’t race up the trail, and eat well. Another key stop is Dingboche (4,410 m). People take extra days there and do short hikes to nearby ridges. It’s all about giving your body time and not gaining more than 500 meters in sleeping altitude each night. Those pauses really do help you avoid hypoxia, which is just a fancy word for your brain and body not getting enough oxygen.
Actually, some trekkers use Diamox (acetazolamide) to help their bodies adjust faster. Doctors usually tell you to start taking it a day or two before you hit higher elevations. It can cause some tingling in your fingers or toes, but that’s normal. Just check with your doctor before you go—everyone’s different.
More importantly, mixing the “climb high, sleep low” strategy with rest days is the best way to play it safe. Build in some buffer days for weather or if someone in your group feels rough. Watch out for each other. Diamox can help, but it’s not a cure-all—you still need to go slow and listen to your body.
Cost-wise, this isn’t a big expense. Diamox runs about 50 cents to a dollar per pill in Kathmandu. Rest days just mean a few more nights in a lodge—maybe $10-20 a night. Honestly, it’s money well spent. A little patience and planning keep you healthy and make the whole trek way more enjoyable.
Essential Tips for Preventing Altitude Sickness :
Climb High Sleep Low: Hike to peaks like Nagarjun Hill near Namche (3,440 m) but return lower for better recovery.
Rest Days Schedule: Mandatory stops in Namche (3,440 m) and Dingboche (4,410 m) for 1-2 days to acclimate.
Symptoms Monitoring: Watch for headaches, dizziness; descend 300-500 m if persistent.
Diamox Usage: Take 125 mg twice daily as preventive; consult doctor for allergies.
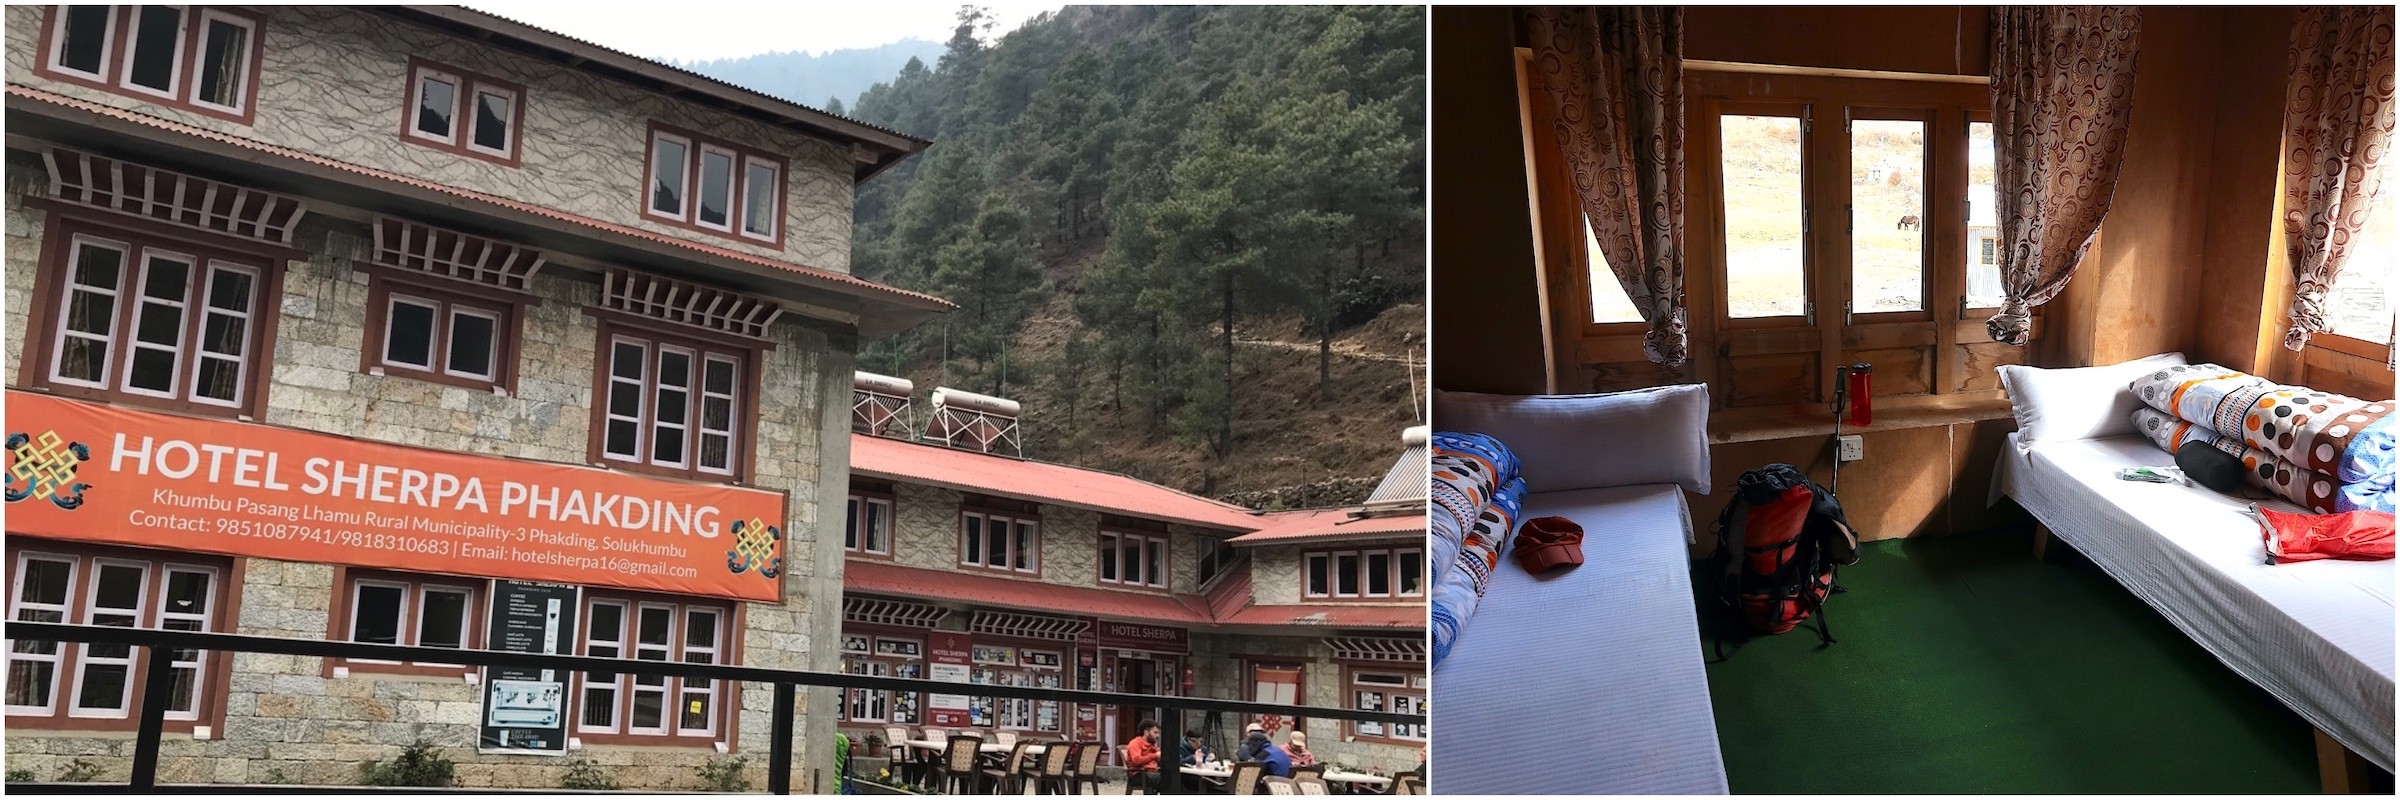
Teahouse Accommodation and Facilities on the Trail
If you’re trekking the Everest trail, get ready to spend your nights in teahouses. They’re everywhere along the route, and honestly, they’re your main option. Expect a small room—usually just two beds, some blankets, and not much else. There’s always a common dining area, and after a long hike in the cold, it feels like a lifesaver.
Here, at lower altitudes, teahouses on the Everest Trail are simple wooden lodges. Don’t count on having your own bathroom—below Namche Bazaar (3,440 m), an attached bathroom is rare. As you climb, the places get a bit nicer, especially in the bigger villages, but nothing too fancy. You’ll always find hot meals on offer—think filling, basic, and perfect after a day on the trail. If you’re watching your budget, these teahouses really deliver.
Worrying about charging your phone or camera? That’s going to cost extra, especially higher up. Above Dingboche (4,410 m), you’ll see solar-powered outlets, and it’s usually NPR 200-500 (about $2-4) per hour. Wi-Fi comes and goes, and it’s not free—expect to pay $3-5 a day for a connection that can be unreliable. The higher you get, the more basic everything becomes, so bring a power bank and be prepared to rely on yourself.
Here, toilets and bathrooms in Everest region are another story. Most teahouses have shared squat toilets and bucket showers. If you want hot water in places like Lobuche (4,940 m), it’ll cost another $3-5. Still, folks do their best to keep things clean. Being this remote, it makes sense to pack a stash of wipes and your own hygiene supplies.
As you move up from Phakding (2,610 m) to Gorak Shep (5,164 m), the standards drop from basic to downright minimal. Sometimes, you’ll find en-suite bathrooms in the lower villages, but it’s rare up high. Menus stick to vegetarian and local dishes—simple, but hearty. Power and Wi-Fi get scarce with altitude, so if staying connected matters to you, bring extra batteries.
In fact, a night in a teahouse usually runs between $5-15 per person. Meals cost another $5-10 each, especially at higher elevations. Prices climb as you get closer to Everest Base Camp, but the deal often includes food and a bed. It’s a system that keeps things running sustainably for locals and trekkers alike.
Want something fancier? In places like Namche, you’ll find “luxury” teahouses offering heated rooms, better Wi-Fi, and private bathrooms for $20-50 a night. Some even throw in free charging. So, no matter your budget, there’s a spot for you—just know that the higher you go, the simpler life gets.
Altitude Level
Room Standards
Facilities Available | Average Cost (USD/Night) | Notes
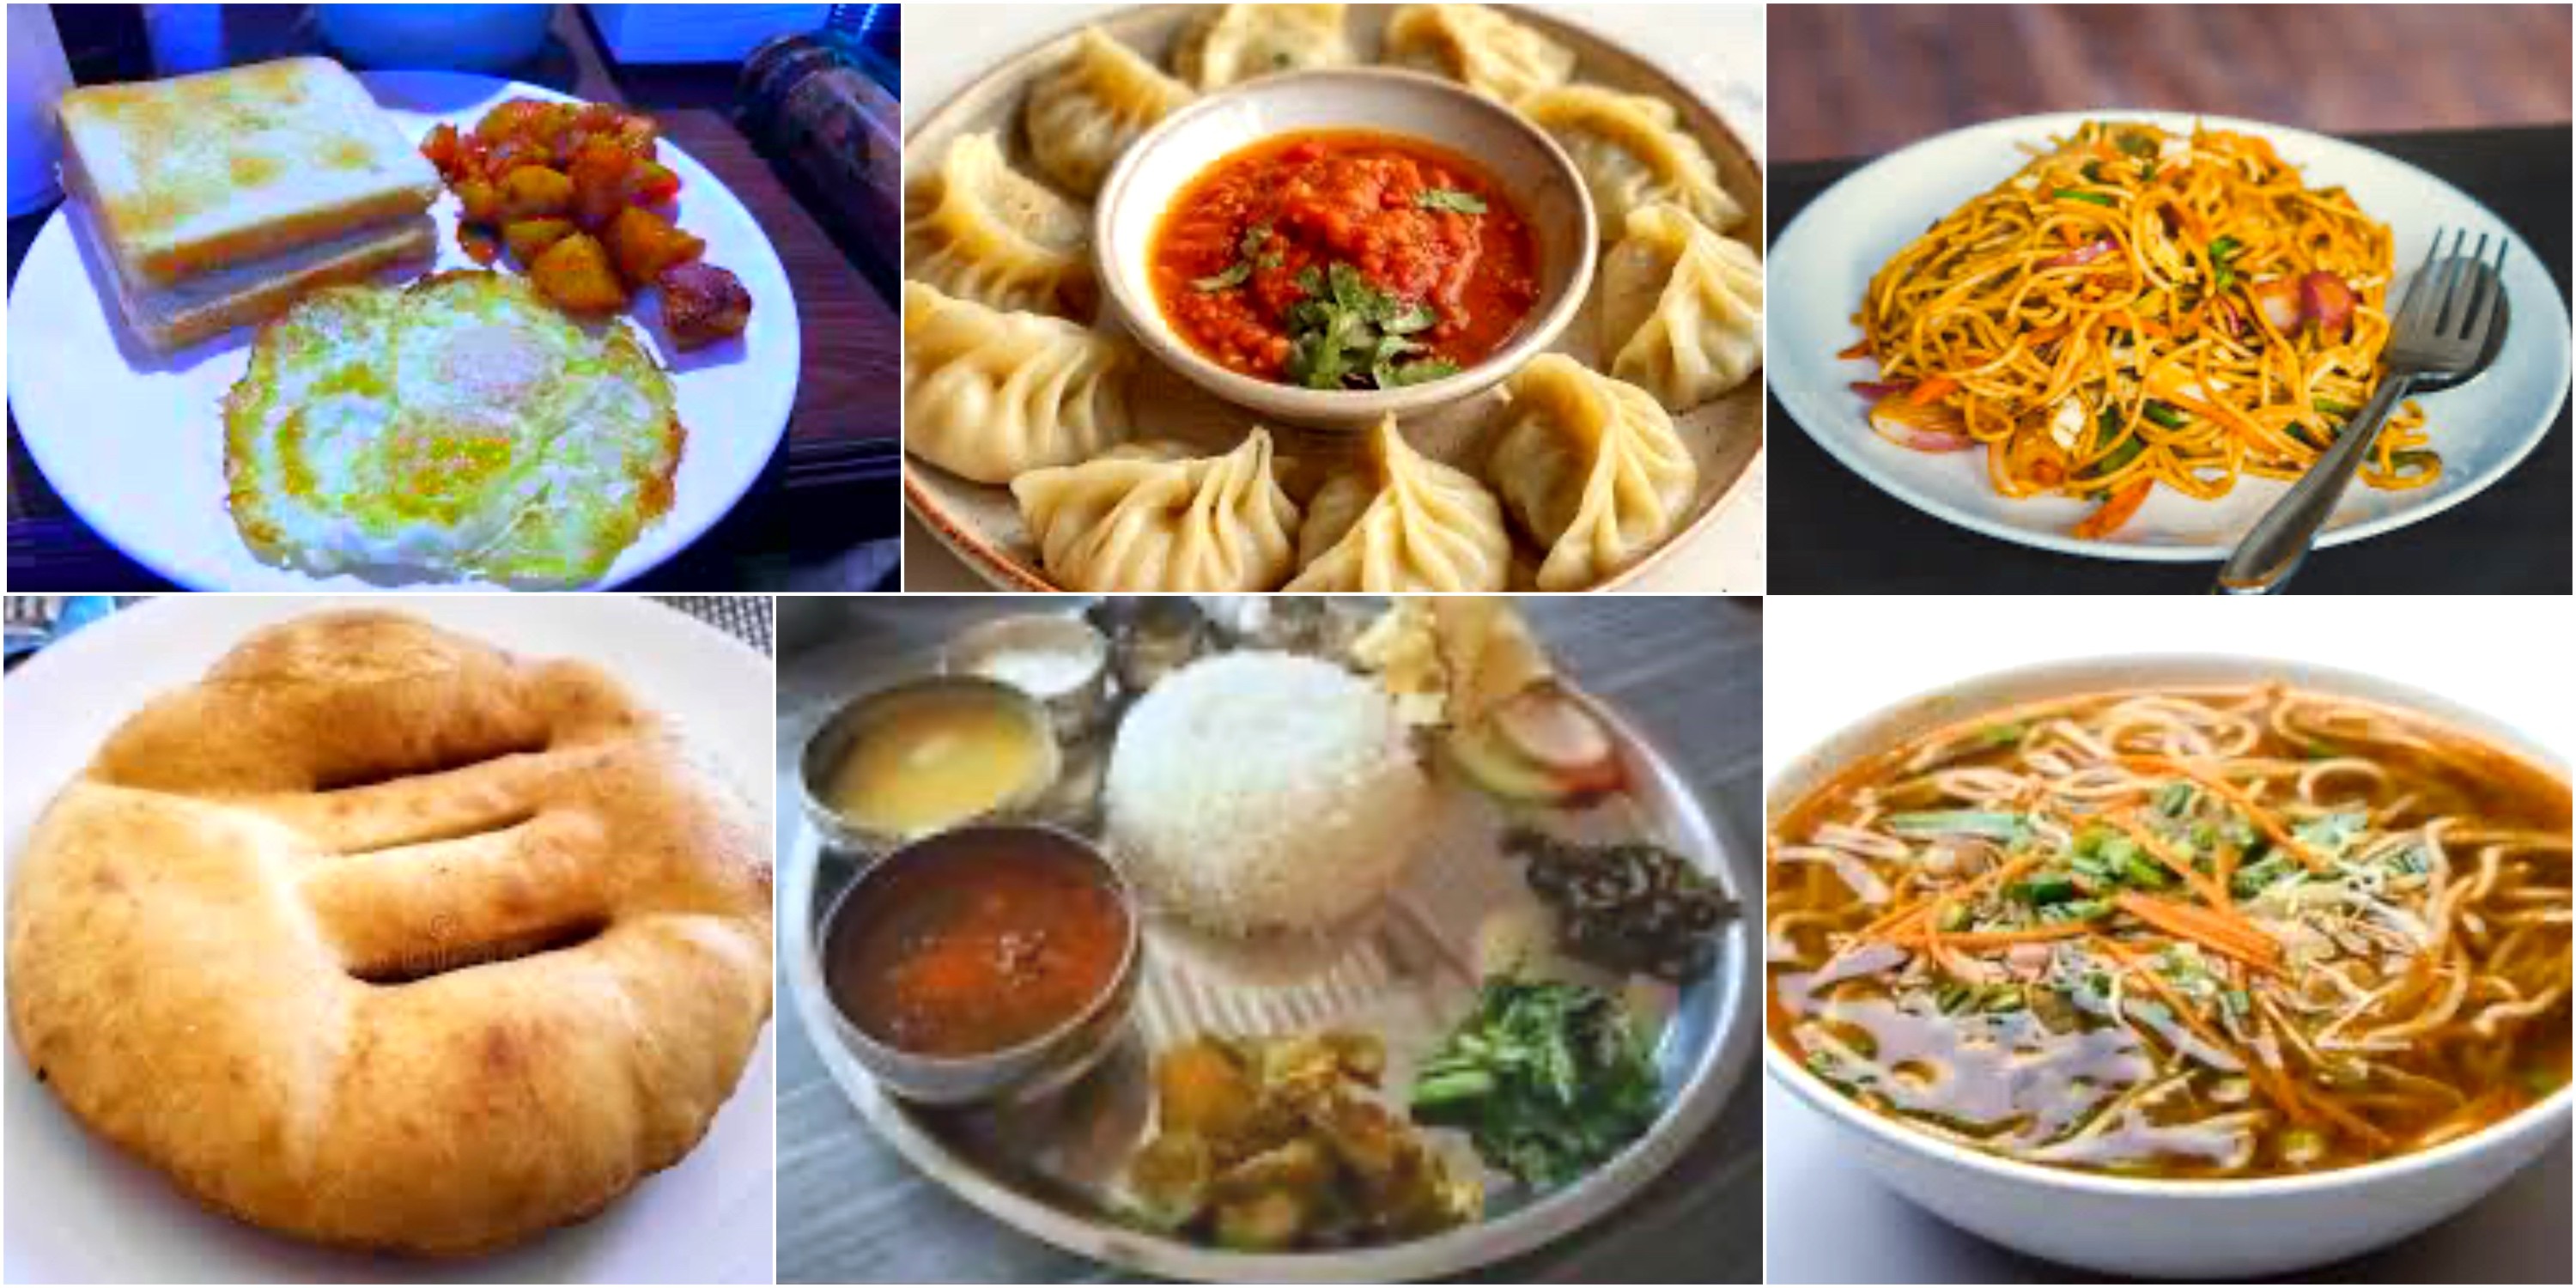
Actually, eating and staying hydrated in the Khumbu is a big deal when you’re trekking around Everest. You burn a lot of energy, so what you put in your body really matters. Dal bhat is the classic meal—it’s everywhere, and for good reason. You get rice, lentil soup, some veggie curry, and spicy pickles. It’s filling, balanced, and, best of all, you can usually get as many refills as you want at the teahouses. Honestly, most trekkers end up eating it every day, sometimes twice a day. It keeps you going.
Here, menus in the Khumbu are mostly vegetarian, and that’s not just for health reasons. Above Namche Bazaar, there’s no refrigeration, so meat isn’t safe. You see a lot of eggs, cheese, potatoes, and vegetable curries instead. It’s lighter on your stomach, which helps when you’re up high in thin air. If you’re craving variety, you’ll find momos (dumplings), noodle soups, fried rice, pasta, and Sherpa stew. Garlic soup is a local trick for keeping warm, and after a while, you’ll probably be grateful for anything different to break up the dal bhat routine.
Likewise, drinking enough is just as important as eating. You’ll need at least 3-4 liters of water every day to stay healthy and avoid altitude sickness. The safest way is to boil your water for three minutes—especially above 3,000 meters. Purification tablets or filters work too, and most teahouses will sell you boiled water if you ask. Hot drinks like ginger lemon honey tea or masala tea are everywhere and feel like a lifesaver on cold nights. Plus, they help keep your electrolytes up.
Moreover, food and drinks aren’t crazy expensive, considering where you are. Meals run about $5-10 at most teahouses, and boiled water costs more the higher you go—usually $1-3 per liter. It adds up, but it’s worth every cent when it comes to your health and performance on the trail. So, plan ahead, eat well, drink plenty, and you’ll be set for a safe and strong trek through the Khumbu.
Recommended Food and Hydration Essentials :
Dal Bhat : Core meal with rice, lentils, veggies; unlimited refills for energy.
Water Purification : Boiling (3 min high altitude), tablets, or filters; aim 3-4 liters/day.
Sip frequently Hydration Tips : Add electrolytes, include ginger tea for warmth.
Packing List: Essential Gear for Everest Trekking
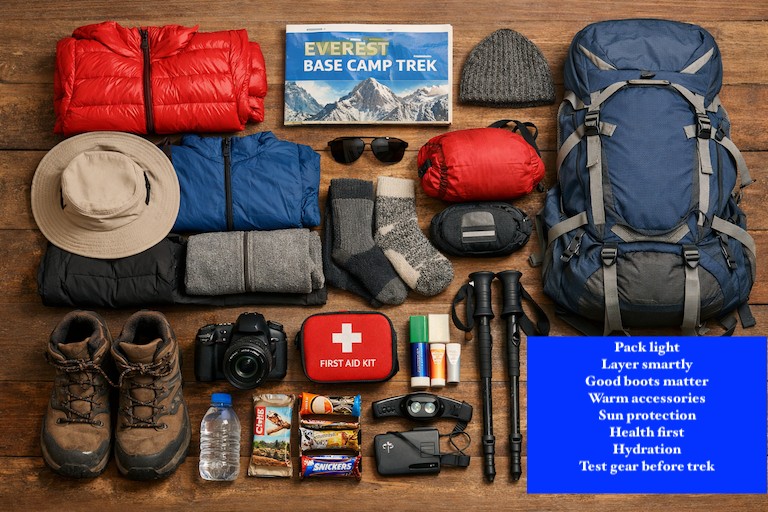
Let’s talk about what you actually need to pack for an Everest trek. The weather changes fast, so you want layers. Start with base layers that pull sweat off your skin. Throw on a warm fleece, then finish with a shell that blocks wind and rain. This way, you can tweak your outfit as the day goes on—no matter if you’re sweating on a climb or shivering at camp.
Meanwhile, good boots are a must. Get sturdy, waterproof trekking boots with solid ankle support. Seriously, break them in before you go or you’ll regret it halfway up the mountain. Thick socks help too. They keep your feet happy on those long, rocky stretches.
Likewise, sleeping at high altitudes means cold nights in basic teahouses. You need a sleeping bag rated to at least -10°C, maybe lower if you run cold. Toss in a liner for extra warmth. And don’t forget a down jacket for when the sun drops—nothing beats it after a tough day.
Trekking poles? Totally worth it. They take pressure off your knees and help you balance, especially going downhill or crossing uneven ground. Collapsible ones pack easier. They might seem optional, but your legs will thank you.
Moreover, medications are another non-negotiable. Bring Diamox for altitude sickness, plus painkillers and blister care. Add your personal prescriptions and a basic first-aid kit. You’ll want to be ready for the little things before they become big problems.
In fact, gear isn’t cheap, but it’s worth every penny. Down jackets and sleeping bags can run $150–$300 each. Boots cost $100–$250 if you’re buying new. Try to keep everything light—your porter (or your own back) will appreciate it. In the end, durable, high-quality gear pays off big time on the trail.
Category
Essential Items
Key Features | Why Important
Layering
Base layers, fleece mid-layer, waterproof jacket/pants
Moisture-wicking, insulating, protective | Temperature regulation on trails.
Preventive, basic treatments | Manage altitude sickness, minor issues.
Costs Breakdown: Budgeting Your Everest Trek
Let’s talk money—because if you’re planning an Everest trek, you want to know what you’re in for. Here’s how the costs stack up, from permits and flights to guides, meals, and everything else you’ll need along the way.
First of all, you can’t even start without permits. You’ll need a Sagarmatha National Park permit ($30) and a Khumbu Pasang Lhamu Rural Municipality permit ($20). So, $50 per person just to get into the region. Good news: you don’t need a TIMS card anymore, so that’s one less thing to worry about.
Likewise, flights come next, and honestly, they’re a big chunk. A round-trip flight from Kathmandu to Lukla is $400–$450 per person. If you’re going during peak season, prices jump. Some folks try flying from Ramechhap instead, which doesn’t save much but can help with availability. Book early if you can—last-minute flights can get expensive or sell out.
Similarly, guides and porters are another big piece of the budget. An experienced guide runs $30–$40 a day and you’ll want them for about 12–14 days, so plan for $360–$560. Porters cost $25–$30 daily, landing you in the $300–$420 range. If you’re trekking with a group, sharing the cost drops your per-person rate. Plus, hiring locals keeps you safer and helps the community.
Now, let’s talk about where you’ll sleep and what you’ll eat. A basic teahouse room is $5–$15 a night—multiply that by 12 nights and you’re looking at $60–$180 for lodging. Meals add up too, especially higher up the mountain. You’ll spend $30–$40 a day on food, so that’s $360–$480 overall. At places like Gorak Shep, prices go up a bit because everything’s hauled in. If you stick with vegetarian meals, you’ll save some cash.
Then there’s all the other stuff. Insurance is a must—budget $100–$200 for decent coverage. Gear rentals? Figure on $50–$100 if you need to borrow anything. Tipping your guides and porters is standard, so add another $100–$200 there. These extra expenses make sure you’re covered and avoid any surprises.
So, what’s the total? If you’re on a tight budget and don’t mind roughing it, you can get Everest Trek by on $900–$1200. For something more comfortable, expect $1500–$2500. If you want luxury (think private rooms or helicopter rides), you’ll spend $3000 or more. Prices have crept up a bit thanks to inflation, so plan accordingly. Trekking off-peak or joining a group can help you save. Realistically, you need at least $1200 to do it right in 2026. The more you know, the better you can plan—and get the most out of your adventure.
Cost Component
Estimated Range (USD, 2026)
Details
Permits
50
Sagarmatha NP (30) + Khumbu (20).
Flights (Kathmandu-Lukla RT)
400-470
Includes potential Ramechhap transfer.
Guide (12-14 days)
360-560
Experienced English-speaking.
Porter (12-14 days)
300-420
15-20 kg load per person.
Teahouse Accommodation (12 nights)
60-180
Basic to mid-range rooms.
Meals (12-14 days)
360-480
3 meals daily, teahouse menus.
Total Realistic Range
900-4500
Budget to luxury packages.
Safety Tips, Responsible Trekking, and Environmental Care
If you’re heading out to trek Everest, safety and responsibility go hand in hand. Start by hiring local guides and porters—they know the trails inside out, especially around places like Namche Bazaar (3,440 m). Their expertise keeps you safe, and at the same time, your support helps Sherpa communities thrive. It’s a win-win.
Here, don’t forget insurance. You need coverage that includes medical emergencies and helicopter evacuation—up to 6,000 meters. Trekkers actually need to show proof of insurance just to get permits, so it’s not optional. With the right plan, you can focus on the journey, not on what might go wrong.
Likewise, altitude sickness is real, and you need to take it seriously. Watch out for headaches or dizziness, especially as you climb toward places like Dingboche (4,410 m). Go slow, drink plenty of water, and listen to your body. Pushing yourself too hard not only risks your health, but it also puts extra strain on the environment.
Most importantly, leave No Trace isn’t just a slogan—it’s essential. Take all your trash with you, use only biodegradable soaps, and skip the campfires to help preserve the forests. These small choices protect the stunning biodiversity of the Khumbu region.
In fact, respect matters, too. Always ask before taking photos at monasteries like Tengboche (3,860 m). Support eco-lodges when you can, and use hand sanitizer to avoid spreading illness. Simple etiquette goes a long way in building good relationships with locals.
Further, be prepared for the unexpected circumstances. Carry a satellite phone or download an emergency app in case you need help far from civilization. Always pack a first-aid kit with essentials like Diamox for altitude sickness. And if you spot a damaged trail, report it—helping maintain the path is part of responsible trekking.
When you put all these pieces together, your trek becomes more than just a hike. Safety, environmental care, respect, and preparation create an experience that’s both rewarding and sustainable. That’s how you make your adventure count.
Key Safety and Responsible Trekking Tips :
Hire Local Guides/Porters: Ensure navigation and load support; boosts local economy and safety.
Follow Leave No Trace: Pack waste, minimize impact; use designated paths only.
Health Precautions: Acclimatize properly, stay hydrated; carry medications for AMS.
Final Reflections: What Awaits After Reaching Base Camp
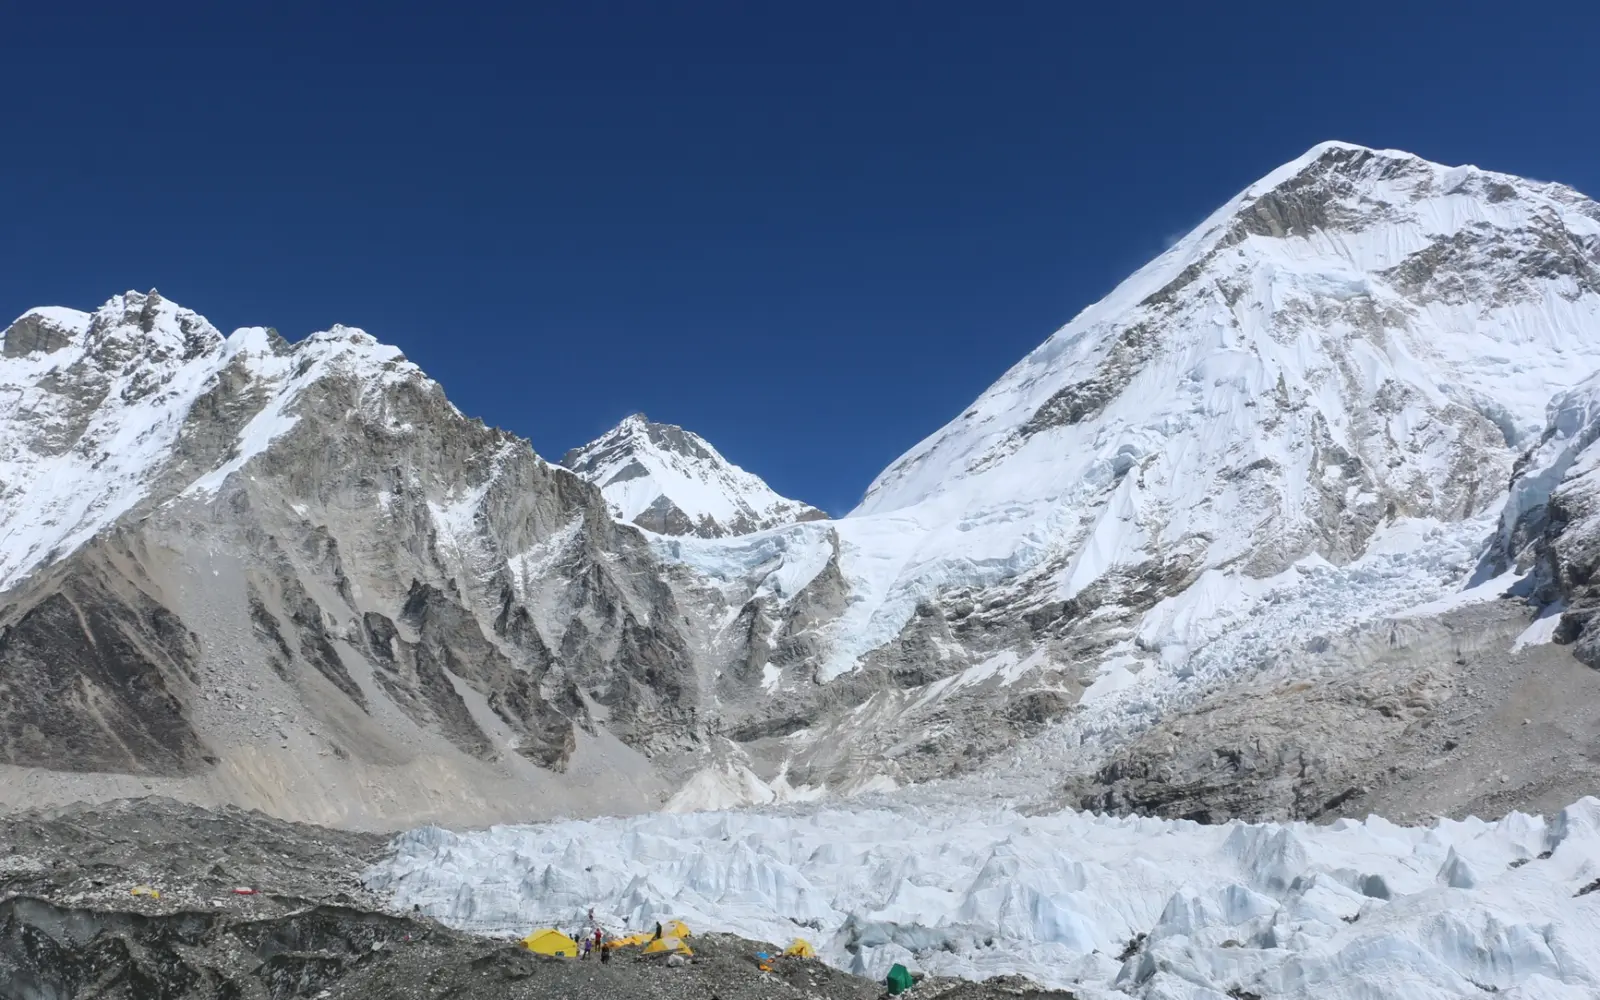
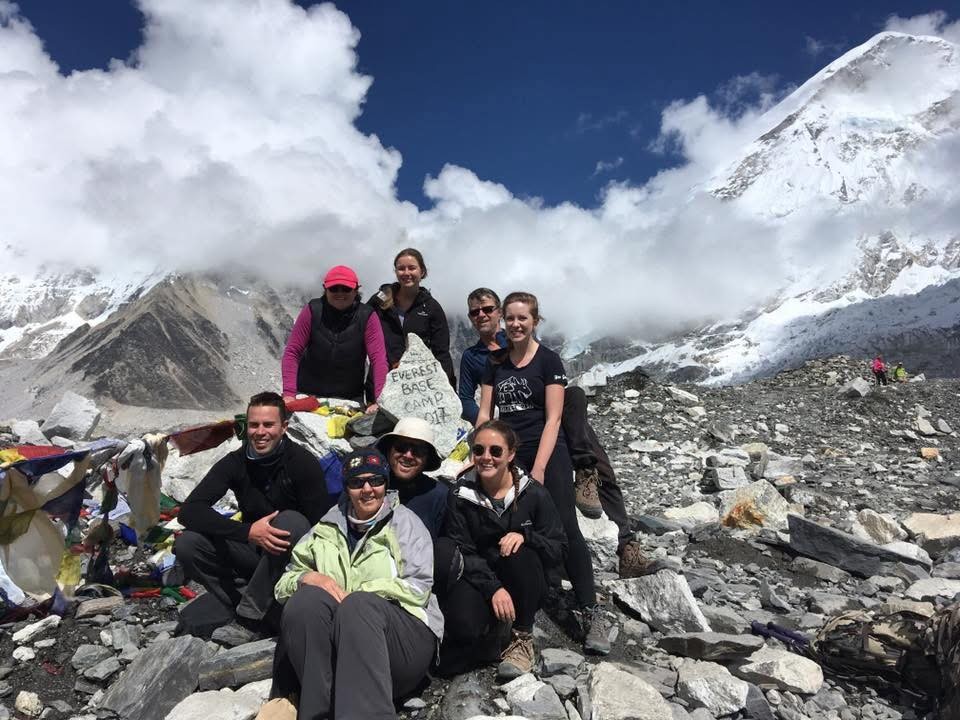
Actually, something changes in you at Everest Base Camp. Standing there at 5,364 meters, with the Khumbu Icefall right in front of you and Everest looming above, it hits hard. People cry, hug, or just stand there in silence, not really able to put it all into words. You feel pure relief and pride after weeks of grit and struggle. Honestly, that rush—right there—turns a regular traveler into someone who’ll tell this story for the rest of their life.
Then you climb up to Kala Patthar at sunrise. It’s even higher—5,545 meters. The mountains glow gold: Lhotse, Nuptse, and Everest itself. The view is so overwhelming, you almost forget to breathe. You just stand there, grateful, feeling like you’ve made it to the top of the world. That moment sticks. Years later, you still see it when you close your eyes.
After the trek, dropping back into Kathmandu feels surreal. Suddenly you’re back in Thamel, dodging motorbikes, eating real food, and soaking in a hot shower. Some people splurge on a massage or wander around ancient stupas like Boudhanath. The city buzzes, but you’re moving slow, letting your body and mind catch up. It’s a gentle landing, and it makes you appreciate what you just did even more.
Why does trekking to Everest Base Camp change people? It’s simple. Climbing through the thin air and pushing on when you’re tired builds a kind of inner strength you can’t shake. Everyday comforts feel like luxuries. You come home more humble and more ambitious, all at once. The mountain messes with your head in the best way—you start to see what really matters.
Likewise, you also end up with a trail family—people you met along the way, plus the Sherpa guides who kept you moving. You’ve laughed together and suffered together, and that sticks. Back in Kathmandu, you’re already planning reunions over coffee or beer. Those friendships? They last.
Moreover, something else happens, too. After standing at Base Camp, you start to rethink your own limits. Maybe you’re braver. Maybe you care more about the planet. You realize that the boundaries you always believed in are just, well, stories you tell yourself. Suddenly, more things feel possible.
As cost for Everest Trek? Honestly, it fades into the background. A handful of dollars for a few days of comfort in Kathmandu, some money for the trek—none of it compares to what you take home. The memory of sunrise at Kala Patthar is priceless. The whole journey gives you stories, friendships, and a sense of yourself that lasts a lifetime.
Lasting Impacts of Reaching Everest Base Camp :
Emotional High Moments: Standing at EBC (5,364 m) and sunrise views from Kala Patthar (5,545 m) create peak euphoria and pride.
Personal Transformation: Builds resilience, humility, and perspective; many report renewed confidence in daily life.
Post-Trek Unwind in Kathmandu: Enjoy hot showers, Thamel shopping, Nepali cuisine, and cultural sites for recovery.
Lifelong Memories: Bonds with Sherpas and trekkers, plus a sense of achievement, make the journey truly life-changing.
FAQS:
1. How far is Everest Base Camp from Gorakshep? The distance from Gorakshep to Everest Base Camp is 3.5 to 4.3 kilometers one way. You will have to walk up a little, 200 meters on rocky ground. Most people take 2 to 3 hours to get there depending on how fit they're the weather. 2. How long does it take to hike from Gorakshep to Everest Base Camp? It usually takes 2 to 3 hours to get from Gorakshep to Everest Base Camp if you're in good shape. If you want to go and come back it will take around 5 to 6 hours, including breaks and time at Everest Base Camp. You have to be careful because of the altitude. 3. What is the elevation of Everest Base Camp? Everest Base Camp is at 5,364 meters. If you start from Gorakshep, which's at 5,164 meters you will go up about 200 meters. This is a deal because the air is thin and there is not much oxygen making the short walk harder. 4. Is the trek from Gorakshep to EBC difficult? Yes, the trek from Gorakshep to Everest Base Camp is hard even though it is not far. The ground is rocky. The high altitude makes it tough. If you take your time and get used to the height in Gorakshep it will help. If you are tired from walking before it will be even harder. 5. What should I wear for the Gorakshep to EBC trek? You should wear clothes that can keep you warm and dry. This means a shirt that keeps moisture away a warm middle layer and a jacket that can keep the wind and water out. Wear walking pants, warm gloves, a hat, sunglasses and strong boots. It can get very cold especially when it is windy. 6. How to prevent altitude sickness on the way to Everest Base Camp? You should get used to the altitude in Gorakshep walk slowly drink a lot of water and not drink alcohol. You can also take some medicine. You should talk to a doctor first. If you do not feel well, you should go down. 7. Can beginners trek from Gorakshep to Everest Base Camp? If you are new to trekking but are in shape and have gotten used to the high altitude you can try it. It is better if you have some experience with trekking. The walk is short. The high altitude makes it hard. Going with a guide can help you stay safe. 8. What time should I start the trek to Everest Base Camp? You should start early in the morning, 7 or 8 AM from Gorakshep. This way you can have weather and see things clearly. You will have time to get to Everest Base Camp enjoy the view and get back before the wind gets strong in the afternoon. 9. Are there any facilities on the Gorakshep to EBC trail? There are no places to eat or rest on the way from Gorakshep to Everest Base Camp. You should bring water, snacks, sunscreen and a first aid kit. Gorakshep is the place where you can get basic things and food before you go to Everest Base Camp. 10. What permits do I need for Everest Base Camp trek? You need a permit to enter Sagarmatha National Park and another permit from Khumbu Pasang Lhamu Rural Municipality. Usually, your trekking company will take care of these permits for you. 11. Is it possible to see Everest from Base Camp? You cannot see all of Everest from Everest Base Camp because there are mountains in the way. If you want to see Everest from all sides you should go to Kala Patthar in the morning. Everest Base Camp is more about seeing the glacier and the atmosphere of the people who climb Everest. 12. What is the best season for Gorakshep to EBC trek? The best times to go are in the spring from March to May and in the autumn from September to November. The weather is stable. The sky is clear. You should not go during the monsoon or in the winter because it can be very slippery, snowy and extremely cold. 13. How rocky is the trail from Gorakshep to Everest Base Camp? The trail from Gorakshep to Everest Base Camp is very rocky with stones and uneven ground. You have to be careful where you step. It is an idea to use walking sticks to help you balance and not hurt your knees. 14. Can I stay overnight at Everest Base Camp? You cannot stay overnight at Everest Base Camp because it is for people who are climbing Everest. You have to go to Gorakshep the same day. You should plan your day so that you can get to Everest Base Camp and back to Gorakshep. 15. What should I carry in my daypack for EBC day hike? You should carry water snacks that give you energy, sunscreen, lip balm, a hat, gloves, a rain jacket, extra clothes, a first aid kit, a camera and toilet paper. Try to keep your bag light, around 5 to 7 kilograms so it is comfortable to carry. 16. How cold does it get on the way to Everest Base Camp? It can get very cold even as low as -10°C in the morning or afternoon when it is windy. The wind can make it feel even colder. You should wear layers. Have a jacket that can keep the wind out to stay safe. 17. Is there mobile network or WiFi at Everest Base Camp? Sometimes you can get a phone signal near Gorakshep or at Everest Base Camp. It depends on your phone company. WiFi is not very good. Can be expensive. You should tell your family and friends that you are going before you leave Gorakshep. 18. What happens if I get sick during the trek to EBC? If you get sick you should stop away rest and go back down if you feel worse. You should have insurance that covers being taken to a hospital by helicopter. Guides are trained to help in emergencies and keep an eye on how everyone in the group's doing. 19. Do I need a guide for Gorakshep to Everest Base Camp? It is a good idea to have a guide for safety to show you the way and to tell you about the local area especially if you have never done this before. If you have a lot of experience and are well-prepared you can go alone. It is still better to have a guide. 20. What comes after reaching Everest Base Camp? After you get to Everest Base Camp and celebrate you will go back to Gorakshep. Many people then go to Kala Patthar to watch the sunrise or start going down. You can think about what you have achieved and enjoy the fact that you made it to this place, in the Himalayas.